
|
Hello! I am finally getting around to getting my latest cross stitch pattern posted here. I know sloths are a super popular animal right now. My son loves them. He suggested my next pattern be a sloth so that's exactly what happened. 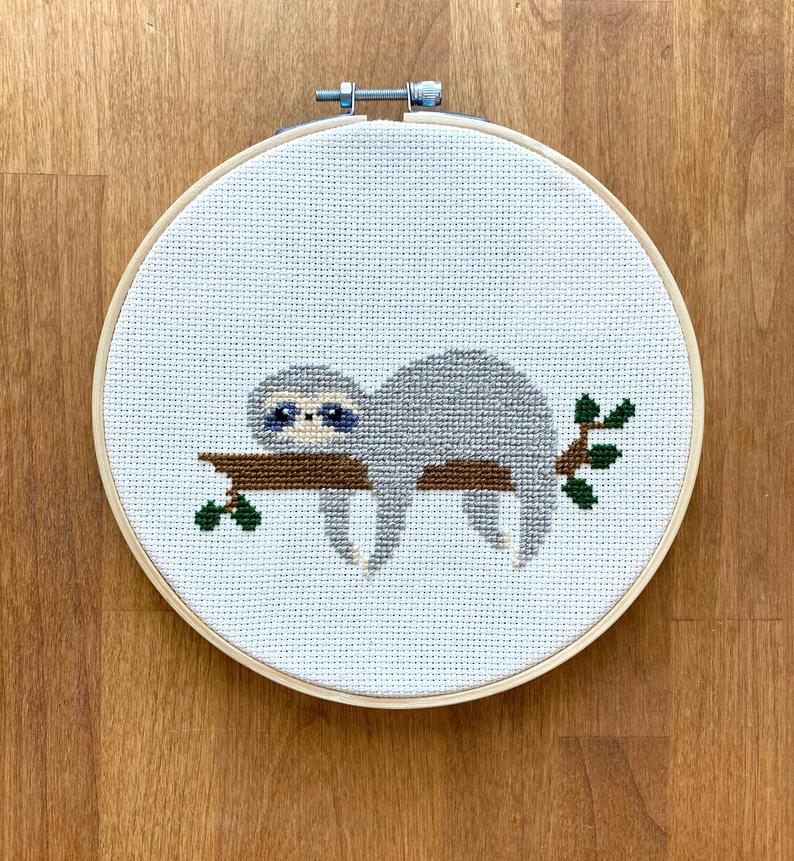 I think it turned out super super cute! We call him Mr. Sloth.
Find the pattern below or if you would like an inexpensive large high definition PDF version with pattern notes you can go head and visit my Etsy shop HERE. I really appreciate the support :) Thank you! We are big Jazz fans here in our house. My boys love going to games and watching them on TV whenever they play. I have been considering a Jazz project for at least a year, but I wasn't sure what I wanted it to be. I went back and forth about whether I should crochet or cross stitch, but cross stitch has been in my life so much lately so it won. While we don't like to pick favorites, I kind of had to in this situation because I knew I couldn't take on the task of stitching the whole team. I decided on a "starting lineup" picking 5 of our favorites and the most likely to be popular with others. We have in order, Rudy Gobert, Donovan Mitchell, Joe Ingles, Mike Conley, and Bojan Bogdonavic. 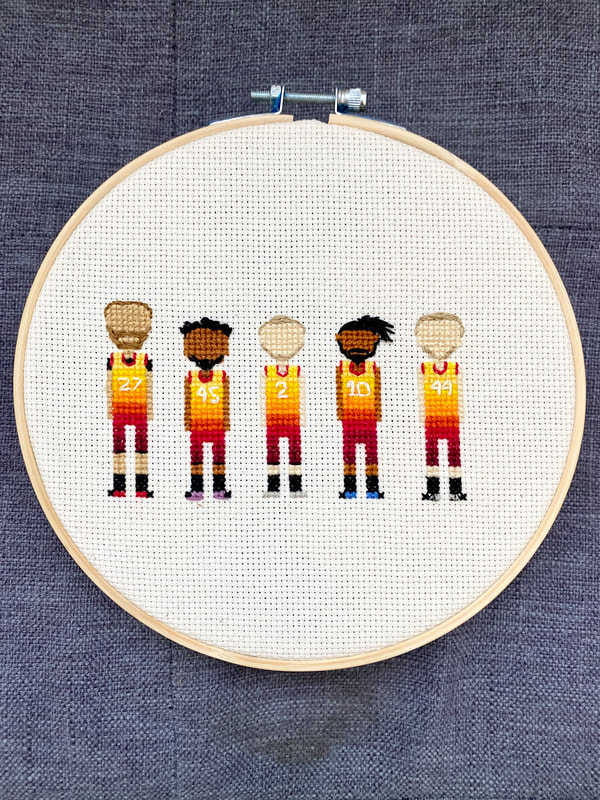 I had so much fun with this one, I put in as many details as I could with each player, so hopefully I did okay making each one look like themselves.
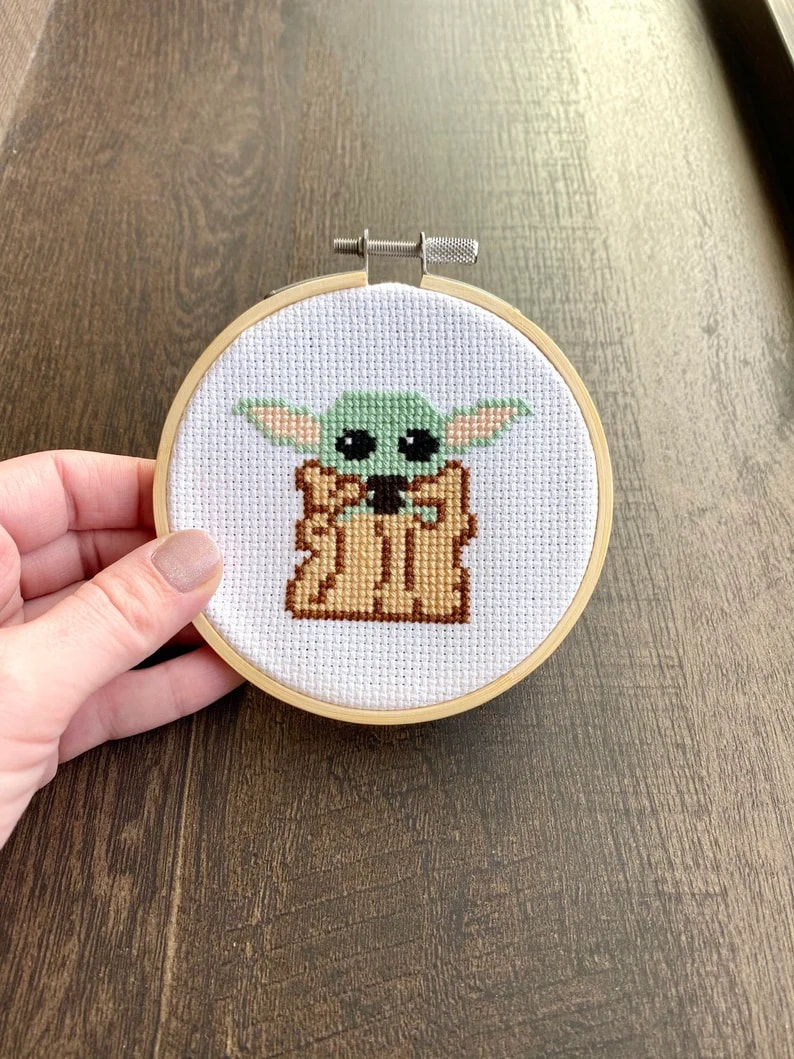 Hello! Thanks for stopping by! I hope you love this baby alien cross stitch pattern. If you would like to support my work, please visit my Etsy shop and check out my other patterns! Thanks so much! CLICK HERE TO GO TO MY ETSY SHOP
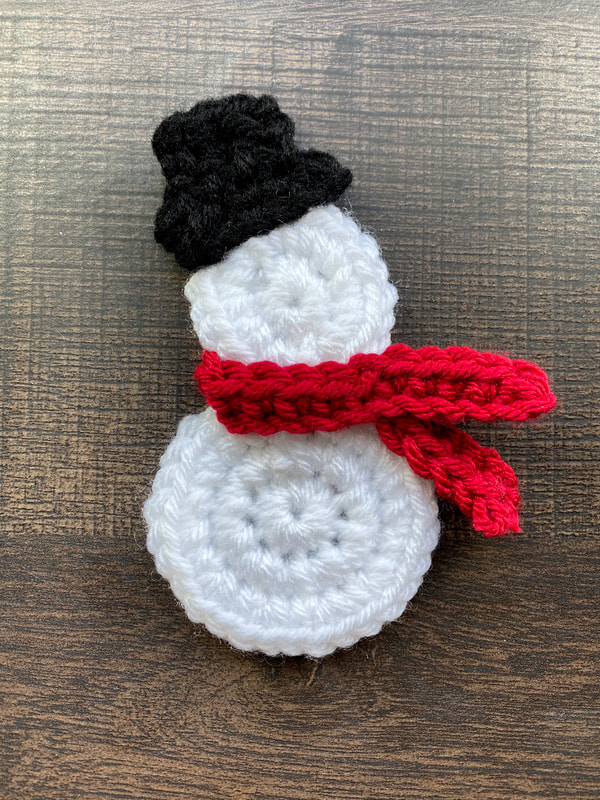 This snowman is so easy and quick to make and put together. It can be used as a gift tag, an ornament, an appliqué, or strung together to make a cute garland. You will need: Size H (5.0mm) crochet hook Worsted weight yarn in white, black and red (or any color for scarf) Yarn needle for assembly Buttons (Optional) Stitches: SC- single crochet SS- slip stitch Body: Magic ring Round 1: 10 SC in ring, join Round 2: 2SC in each stitch around, join Round 3: 2SC in first stitch, 1 SC in next (Repeat around), join Fasten off and set aside Head: Magic ring Round 1: 10 SC in ring, join Round 2: 2SC in each stitch around, join Fasten off and set aside Scarf: ( In red, or color of choice) Chain 24 Row 1: SC in second chain from hook and in each chain across Fasten off and set aside Hat: (In black) Chain 7 Row 1: SC in second chain from hook and in each chain across. Chain 1 and turn. Row 2: SC in each stitch across. Chain 1 and turn Row 3: SS in the first stitch, SC in next 4 stitches. Chain 1 and turn Row 4-5: SC in each stitch across. Fasten off Assembly: Using a yarn needle and white yarn, attach snowman head to body, overlapping them slightly. Place scarf around the snowman and overlap each side to create a tied look. (refer to photos for help with placement) Sew scarf in place with coordinating yarn. Sew hat to top of head with coordinating yarn. Sew or glue buttons in place. 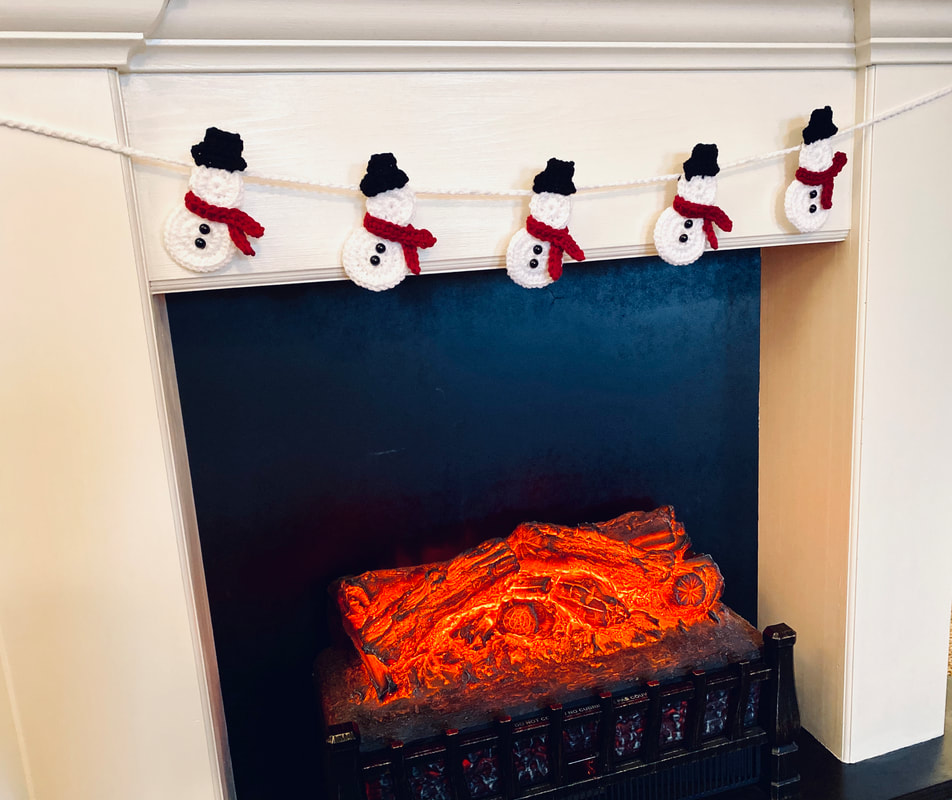 To create banner: Make 5 snowmen using the instructions above. Chain 150 chains in white and using a yarn needle, string the snowman across the yarn through one of the stitches on the back of the snowman's head. 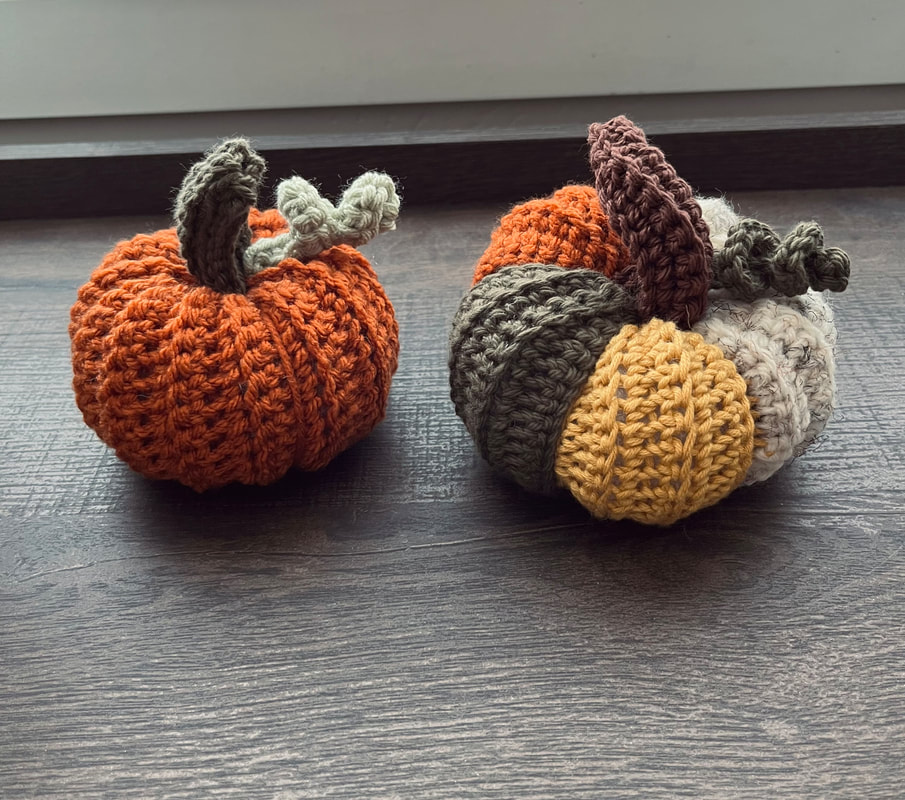
To Begin: Chain 23 Single crochet in the second chain from the hook and in each chain across. Chain 1 and turn From here on you will be crocheting into the BACK LOOPS ONLY. Continue rows until you have about 32. You should have a nice rectangle shape. If you don't, add more rows until it's less of a square and more of a rectangle. See photo below. 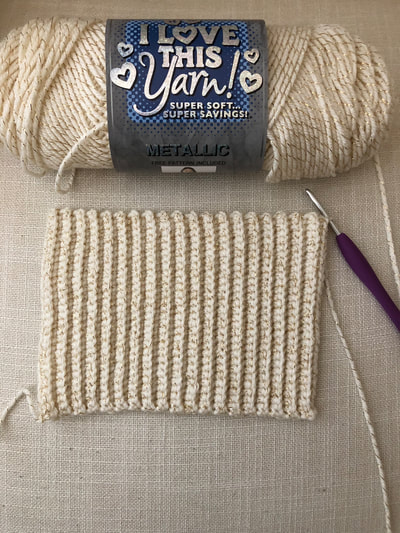
Fold your rectangle into a tube and either slip stitch the edges together or use a yarn needle to whip stitch. You should have something looking a little like this 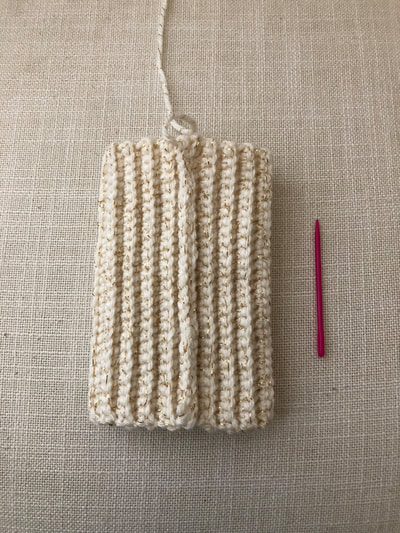
Now you need to close up your ends. Start with the bottom and using a yarn needle weave in and out of the top stitches. Pull tight to cinch closed. 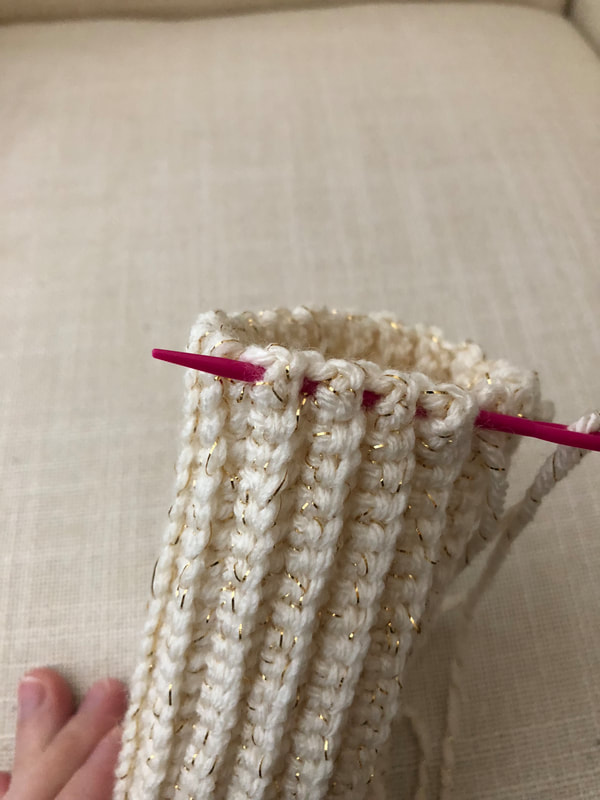
This is where you will stuff the pumpkin. I have learned through trial and error that a better shaped pumpkin happens when it's not overstuffed. Not too much, not too little.
Once you have added stuffing, complete the previous steps of cinching up the top. Before you pull it tight you can add a little more stuffing into the top. 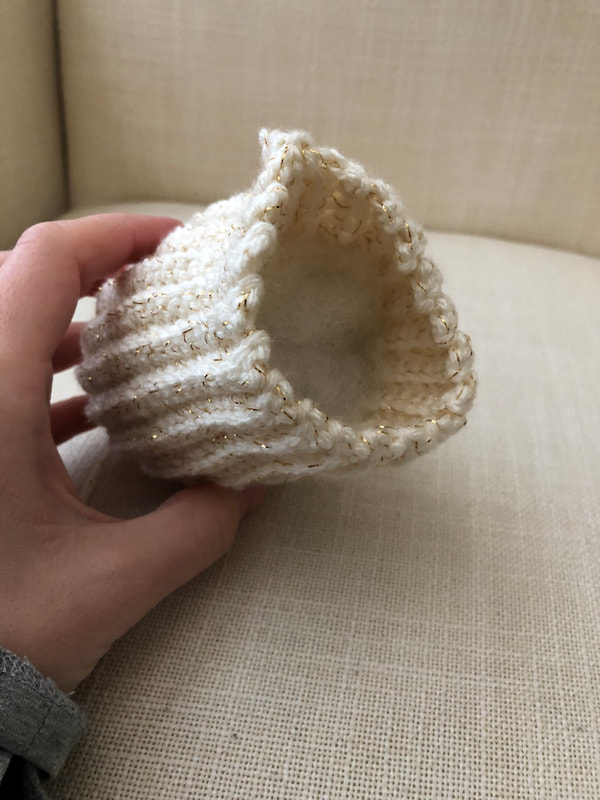
You will finish with an oddly shaped oval.
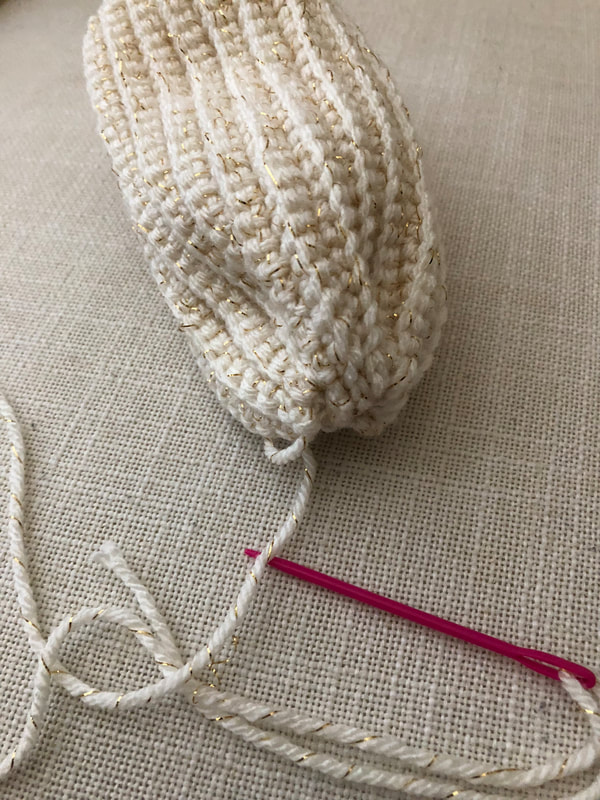
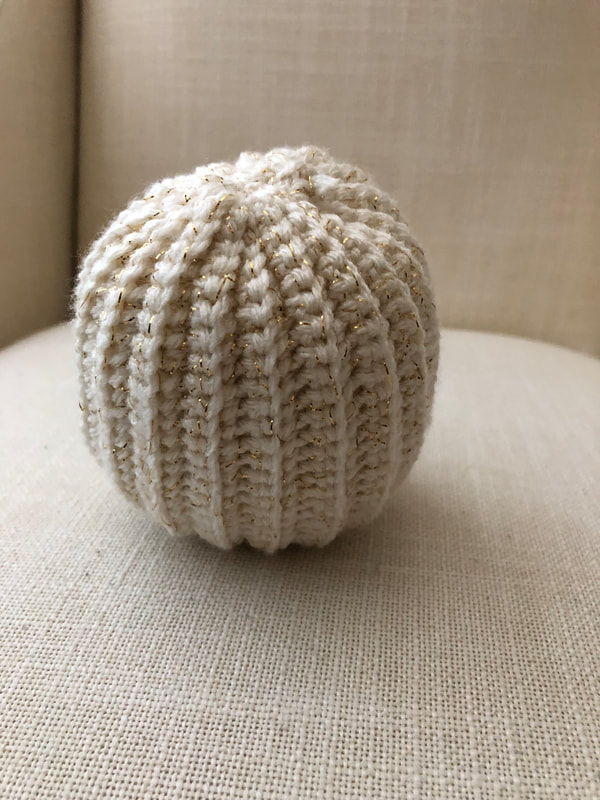
Cut a long length of yarn and thread your yarn needle. Starting at the top of the pumpkin, insert the needle right down the middle and pull it though to the bottom. Go around the outside of the pumpkin in between the grooves and back down through the middle of the pumpkin again. Pull tight and repeat keeping about 3 or 4 grooves in between each yarn circle around. It should start looking like the photo below. You can see some of the yarn in between the grooves and the one piece of yarn I haven't pulled tight yet. I found that making your "bump" sections different sizes makes the pumpkin look more real. No pumpkin is perfectly shaped right? 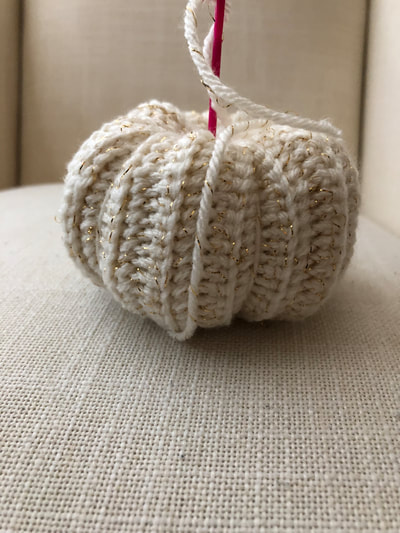
When you're satisfied with how it's looking fasten off your yarn with a knot. 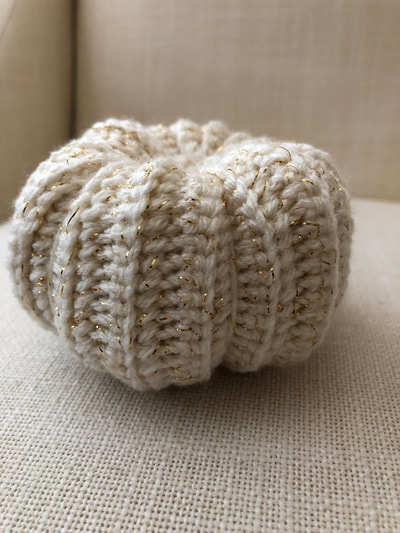
The stem is created by following the steps below: In a magic circle chain 6 (8 or 10 for larger stem) SC in each chain around for about 4-5 rows. Use your judgement here to make the stem as long as you'd like. When you are happy with the size, slip stitch your final chain and fasten off leaving along chain for attaching to pumpkin. The curly leaf is created by following the steps below: Chain 20 (more if you'd like a long curl) 2 single crochet in each chain to the end. Fasten off leaving a long chain for attaching to pumpkin That's it! Experiment with different yarn sizes and colors! I can't wait to see what you create! 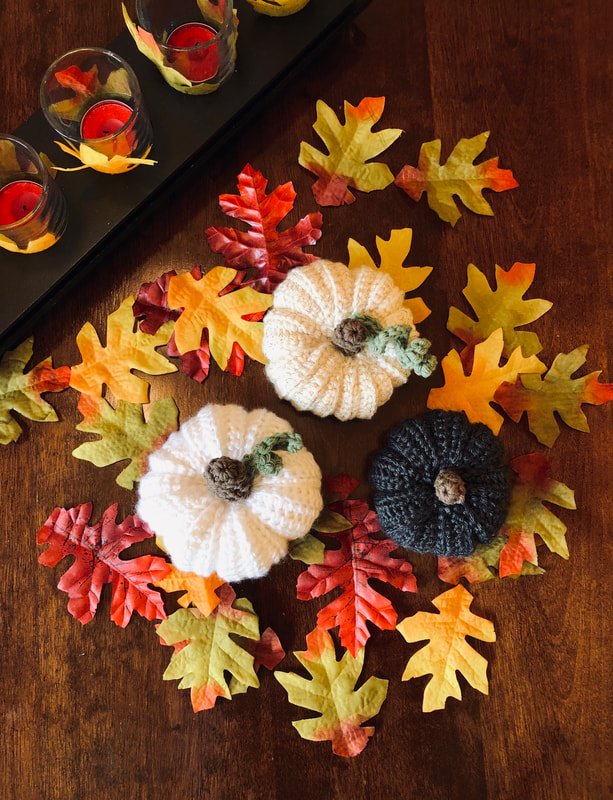
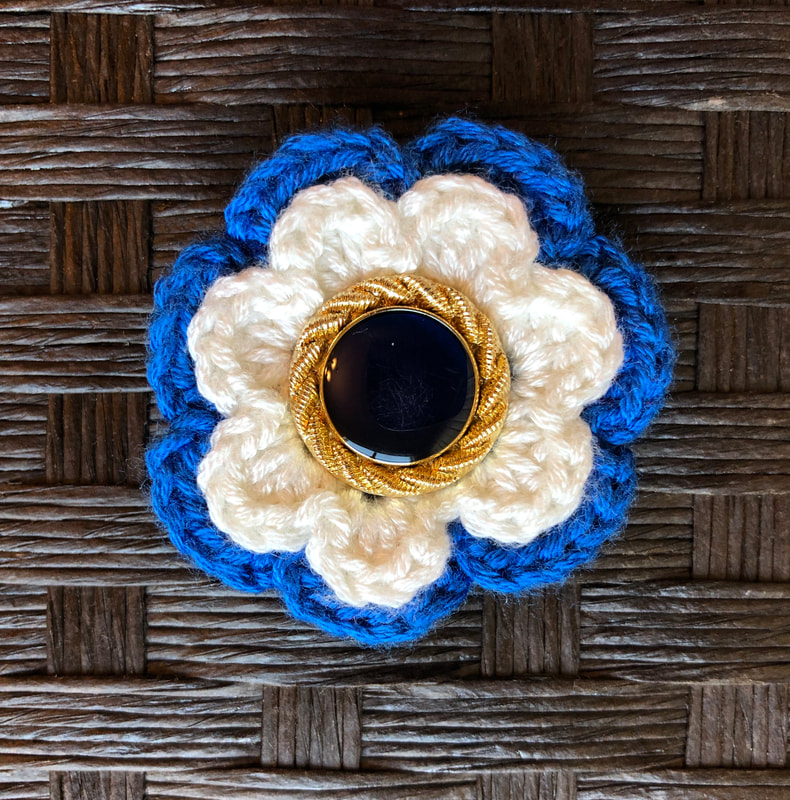
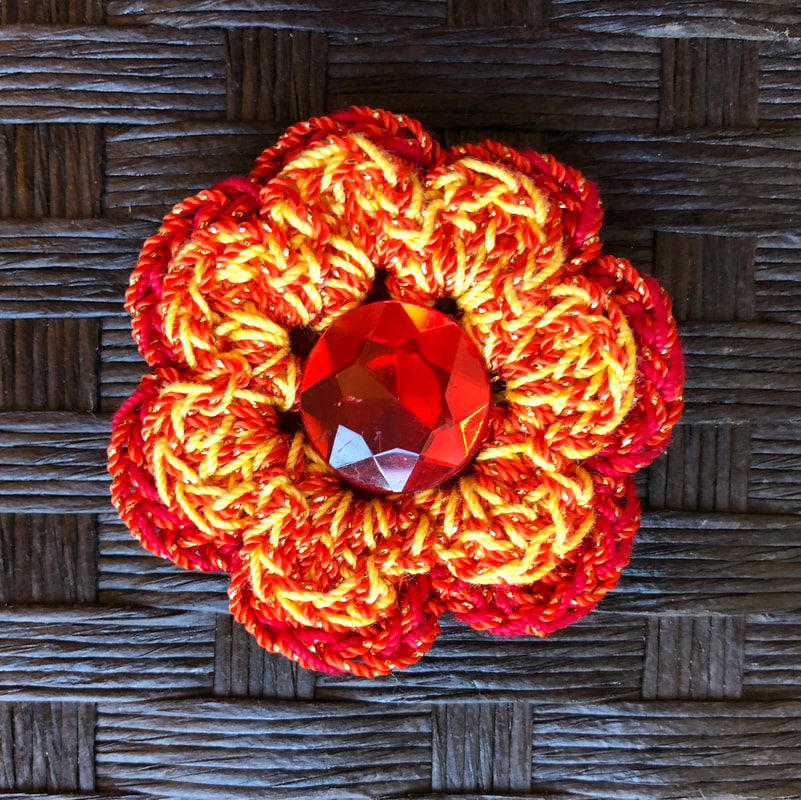
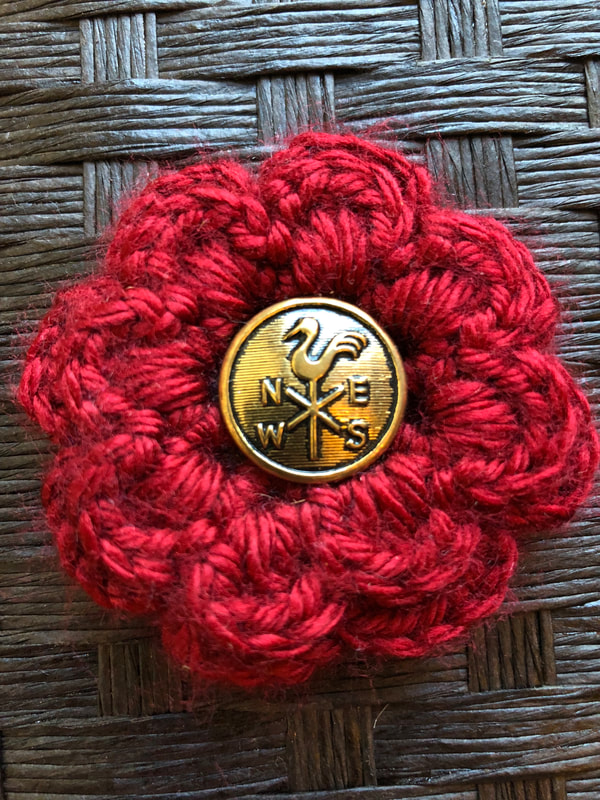
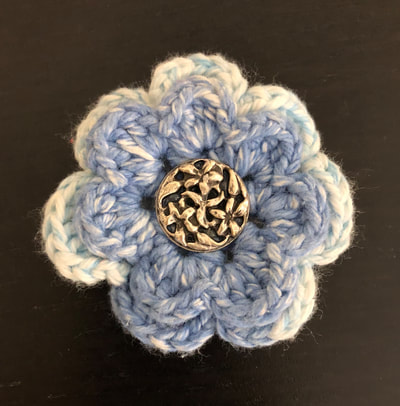
A few years ago my mom and I made close to 1000 of these flowers for a craft fair. We sold tons and kept some of our favorites and now I have a collection I can't seem to give up. We had the most fun picking and choosing what buttons to put in the middle. After each flower was finished we would spend hours trying buttons in the center of each flower and deciding which one looked best. A few of the buttons are vintage from my grandmothers button collection over the years. Getting creative is the best part. Buttons, gems, and even erasers were used for the center of these flowers, and there is definitely more than one option for each flower. This pattern is considered a beginner/intermediate pattern. It can get a little tricky trying to figure out the layering, but once you get the hang of it, its easy and works up quickly. 1 flower can be finished in less than 30 minutes. Note: A lower weight yarn will result in a smaller flower and need a small size button. A heavier weight or chunky yarn will result in a large flower and need a large button. You will need: Yarn -Be creative. ANY yarn will work Crochet Hook (Choose your hook size based on the recommendation from the yarn) Felt Sheet Hot Glue Alligator or Hair Clip Button Check out the pattern below and have fun shopping for buttons :) Chain 6, sl st in first chain to form a circle (sc in circle, chain 3) repeat 7 times, sl st to first sc In chain 3 space: (sc, ch1, 3dc, ch1, sc) repeat 7 times, sl st to first sc, turn (sc in spoke of previous round, ch4) repeat 7 times, sl st in first sc, turn In ch4 space: (sc, ch1, 5dc, ch1, sc) repeat 7 times, sl st in first sc, turn (sc in spoke of previous round, ch5) repeat 7 times, sl st in first sc, turn In ch5 space: (sc, ch1, 7dc, ch1, sc) repeat 7 times, sl st in first sc, tie off It can be a bit confusing to understand the first time around, so I decided to make my very first crochet video! Its a little rough as I really haven't ever filmed before, but I hope it can be helpful! I used a medium weight 4 yarn and a size H (5.0mm) hook and it made a large flower. Check it out HERE Once the flower is made you will need to cut a piece of felt in a circle the same size as the back of your flower. Cut another strip about 1/2 inch wide and glue it to the back. Add an alligator clip or any type of hair clip to use it in hair or clip it on to a crochet headband. I will have a pattern for headbands up soon! So make sure to check back. Here's a photo of the back of the flower with the felt pieces finished and a clip on it. 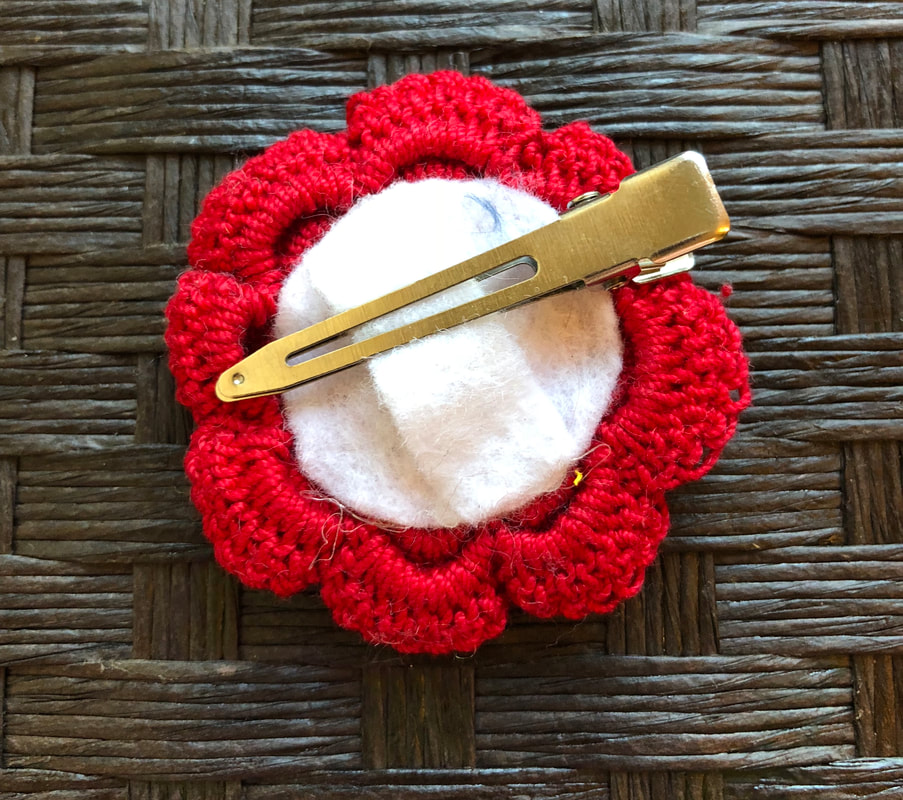 A few headbands/ear warmers with a flower attached. 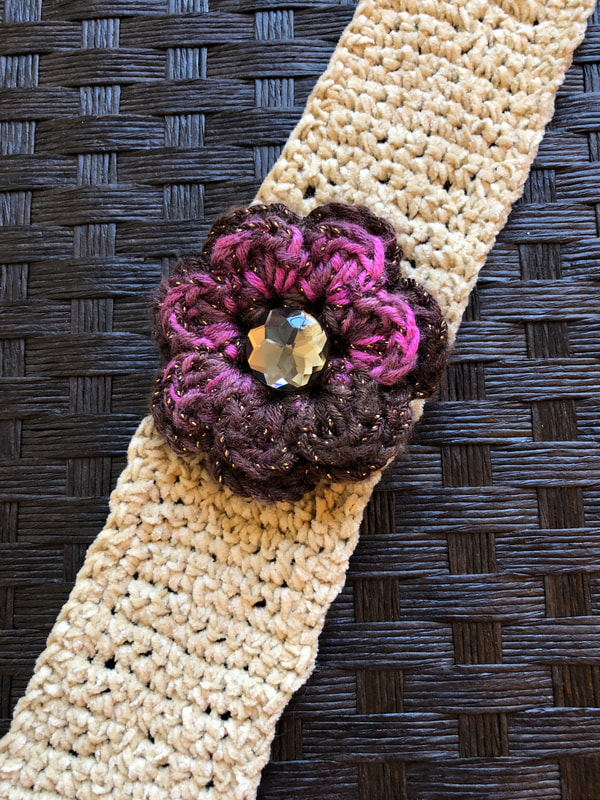 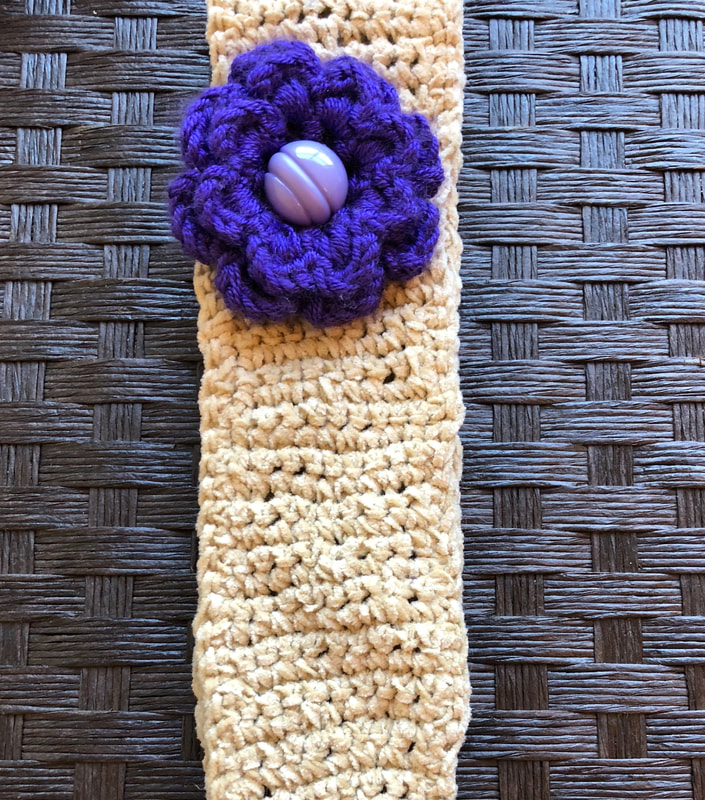 Let me know in the comments if you have any questions. Thanks for stopping by! Happy Crocheting!
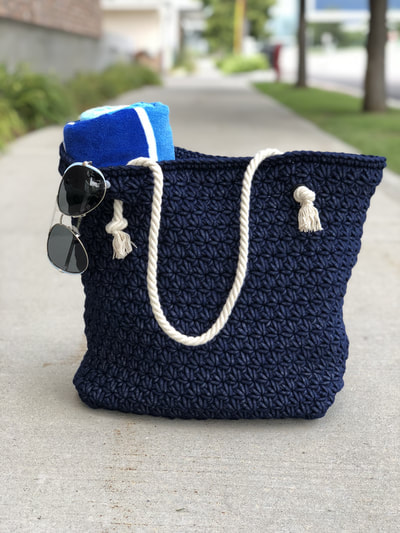
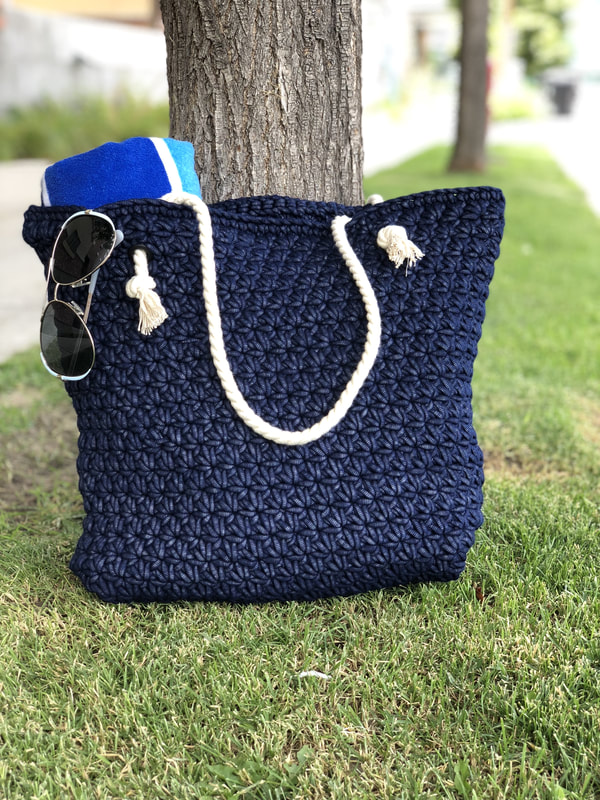
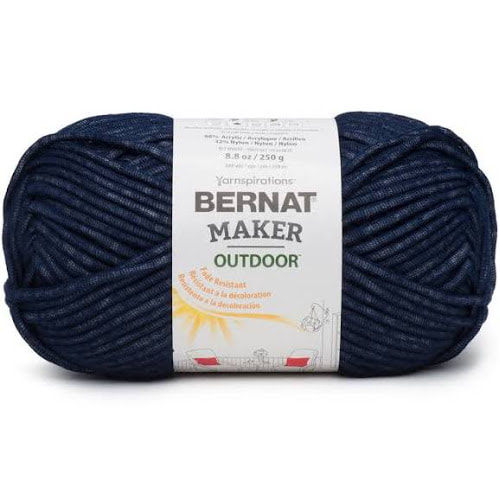
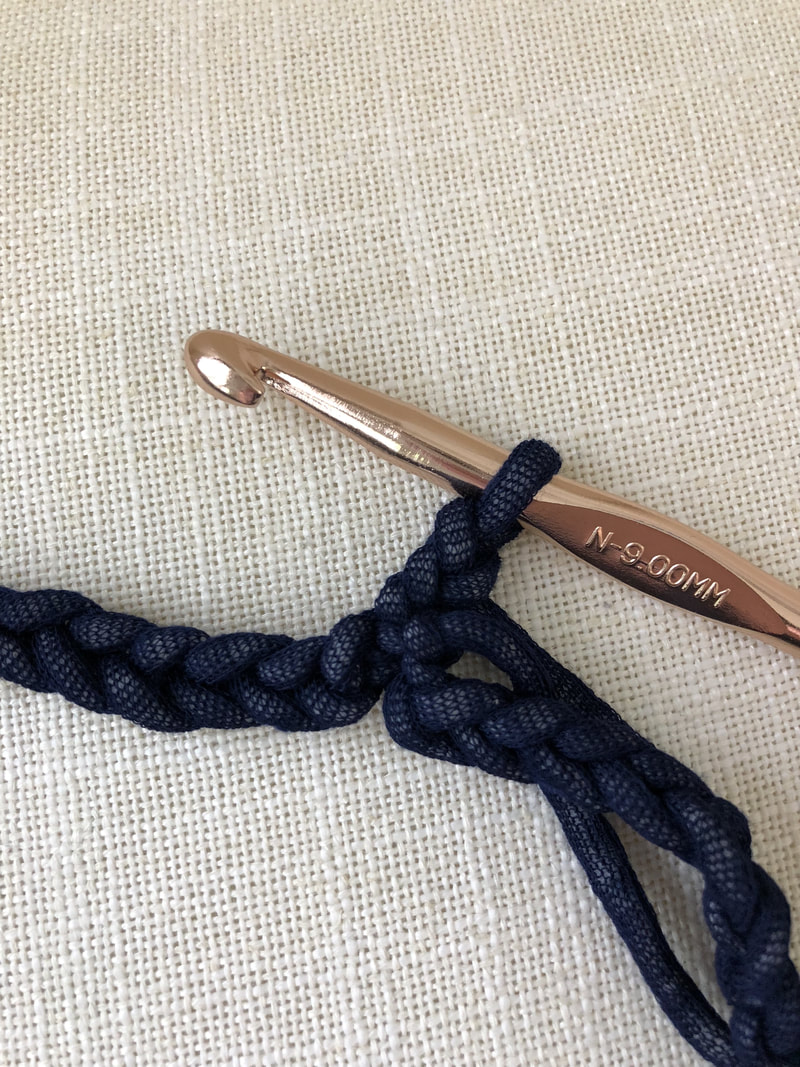
2023 Update: This yarn has been discontinued. I don't currently have a recommendation for a substitute, but any yarn of the same weight will yield the same results without the waterproofing. This bag is made with Bernat's new Outdoor Yarn using the star stitch. When I came across this yarn I was so excited! I had so many ideas but decided on a bag because of how versatile it could be. It works as a picnic bag, a park bag, a beach bag or just a tote when you need one. The perks of using the outdoor yarn is you can literally take it anywhere without worrying about ruining it like you would with a regular yarn. It is a Joann exclusive so it is only available for purchase online or in their store. If you'd like to purchase an inexpensive ad-free version of this pattern visit my Etsy shop HERE So lets get to the instructions! You will need: 2 balls of Bernat Outdoor Yarn Size N (9mm) Crochet Hook Yarn needle (optional) 2 yards of 3/8" twisted rope (I found mine at Joann) 1/2" Fashion Grommet Kit (Also found at Joann) Chain 95 Slip Stitch to beginning chain to form a circle (careful not to twist) For a super fun trick to keep your chains from twisting check out this youtube video HERE If you aren't familiar with the star stitch or how to do it in the round I would check out this awesome tutorial HERE For a quick refresher the star stitch is done like this: First Stitch: insert hook in second ch from hook, pull up a loop, insert hook in next ch from hook, pull up a loop, repeat until there are 6 loops on your hook, yarn over, and pull through all 6 loops -this creates the "spokes" of your star. chain 1 to finish stitch which will make the center "eye" of the star. Next stitch: Insert hook in “eye” you just made, pull up a loop, insert hook in last "spoke" of previous star, pull up a loop, insert hook in the foundation chain of the "spoke", pull up a loop, insert and pull up a loop on the next 2 chains (6 loops on your hook) yarn over and pull through all 6 loops; ch 1 to finish stitch and make the “eye” of the star. Continue this to the end. On your last star do not chain 1, your chain 1 will be a slip stitch to the first star stitch. Chain 3 to begin your star stitches.
The photo above shows 1 star stitch completed. Continue star stitches until you reach your first stitch again. Instead of closing your last star stitch with a single crochet slip stitch to the first stitch. As shown in the photo below
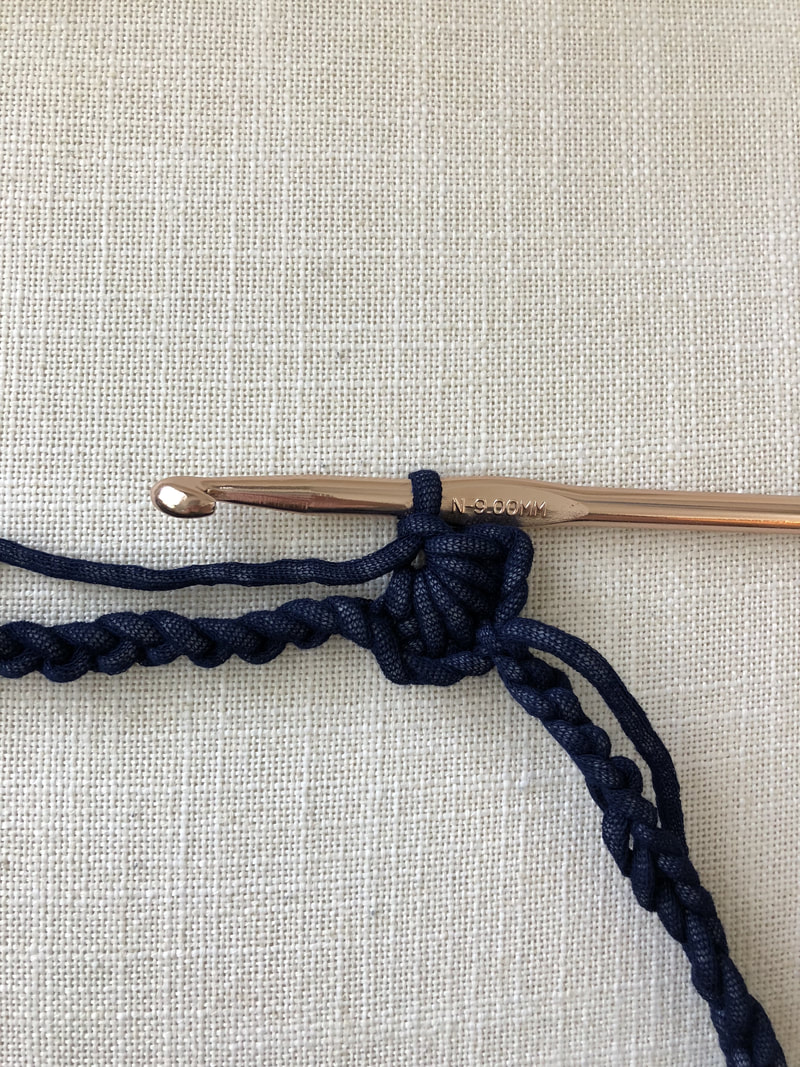
Chain 3 and continue star stitches all the way around for round 2.
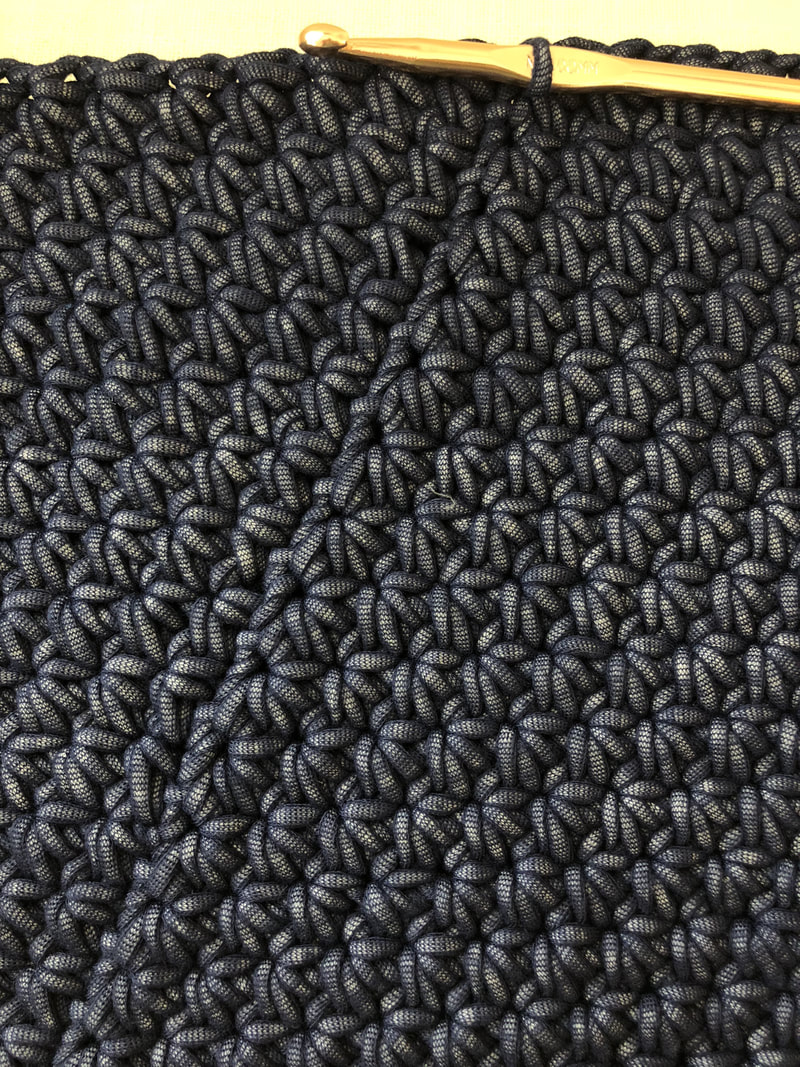
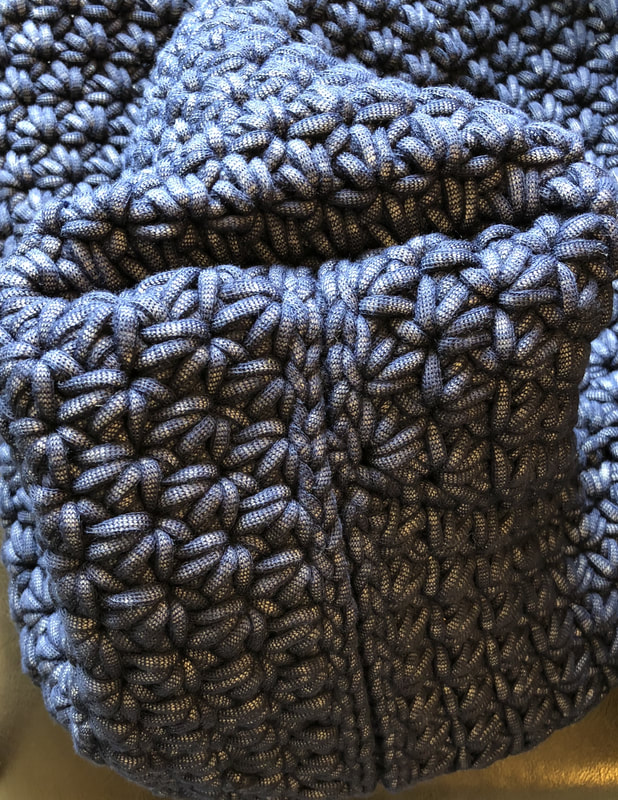
Slip stitch to the beginning. Chain 3 and repeat. Continue this pattern until you have 21 rows of star stitches. You will start to create a seam as you go, this will be the back of your bag and isn't very visible as long as you keep your final star stitch and slip stitch to the top chain fairly tight. The photo below shows the seam on my bag.
To create a finish around the top slip stitch in each stitch around.
After finishing your slip stitches across the top of your bag it is time to sew the bottom together. TURN YOUR BAG INSIDE OUT. Using a yarn needle (if you don't have a yarn needle you can slip stitch the bottom shut), cut a piece of yarn about 40 inches in length and whip stitch the bottom together.
With you bag still inside out you are now going to form the base of the bag. Fold the bottom you just stitched together so the seam is in the middle and the corners of the bag lay flat. (see photo below- the seam is directly under the tape measure) You will stitch a straight line across at 4 inches.

Complete that on the other side as well so you have 2 stitched triangles on each corner. Turn your bag right side out and make sure the triangles you just stitched lay flat in the bottom of your bag. If you'd like to stitch them down to make them stay you can do that. I left mine the way it was, they do flatten out more over time.
This picture is kind of an odd angle but this is how your bag should look at the bottom from the outside. You can see the seam running down the middle of the photo and the "pockets" of sorts sewing your triangles made. This forms a base for you bag to be able to stand flat.
The bag is almost complete! Now you will need a 1/2" grommet kit. I decided to use grommets to be able to hold the weight of whatever was in the bag. I found my grommet kit at Joann.
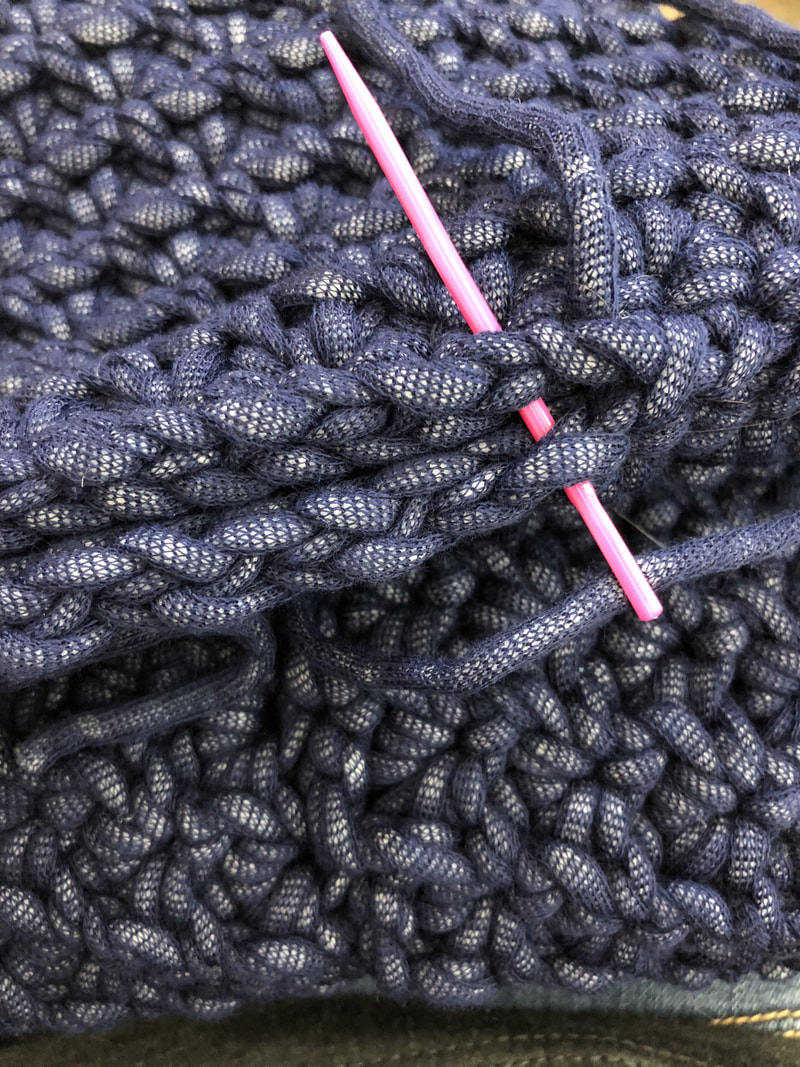
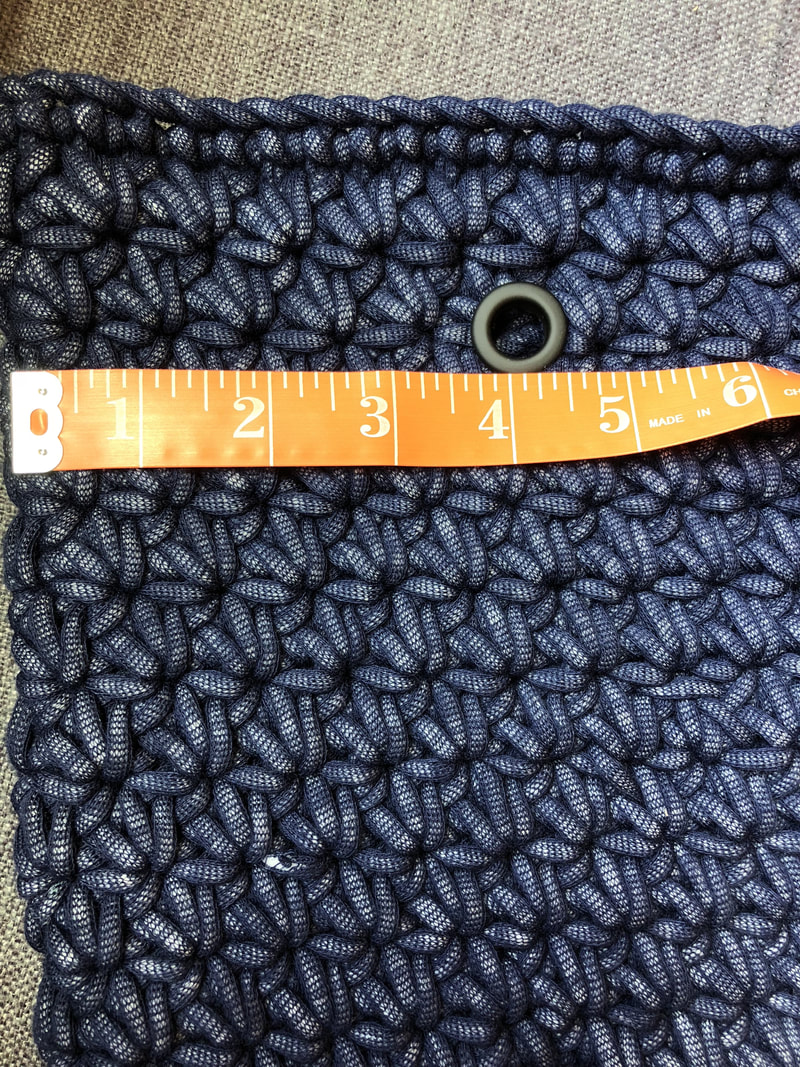
The great thing about the star stitch in this project is it makes its own holes. Normally you would have to crochet spaces for the grommets to go, but that isn't necessary in this case. Put the grommets in the very center of the star stitch With the seam on the back measure 4 inches from the left and right sides. I placed my grommets on the 3rd row down from the top of the bag. You do have to kind of wiggle them in, but the tight space makes it much easier to hammer them in because they stay put. Place your grommets. If you would like your grommets a little closer together go ahead and move a few spaces closer to the middle of the bag. You really can pick and choose where you'd like them to be. Follow the instructions on the kit to attach the grommets to the bag. Line up your front and back side of the bag and attach the grommets in the same place on the back side.
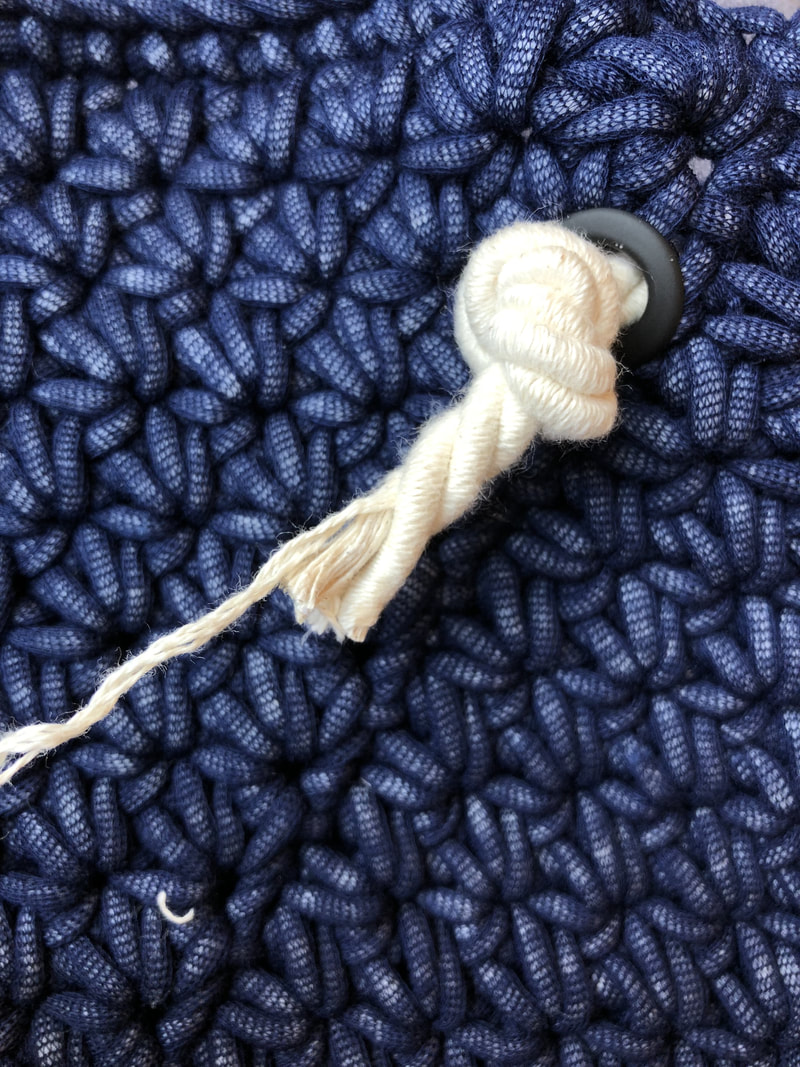
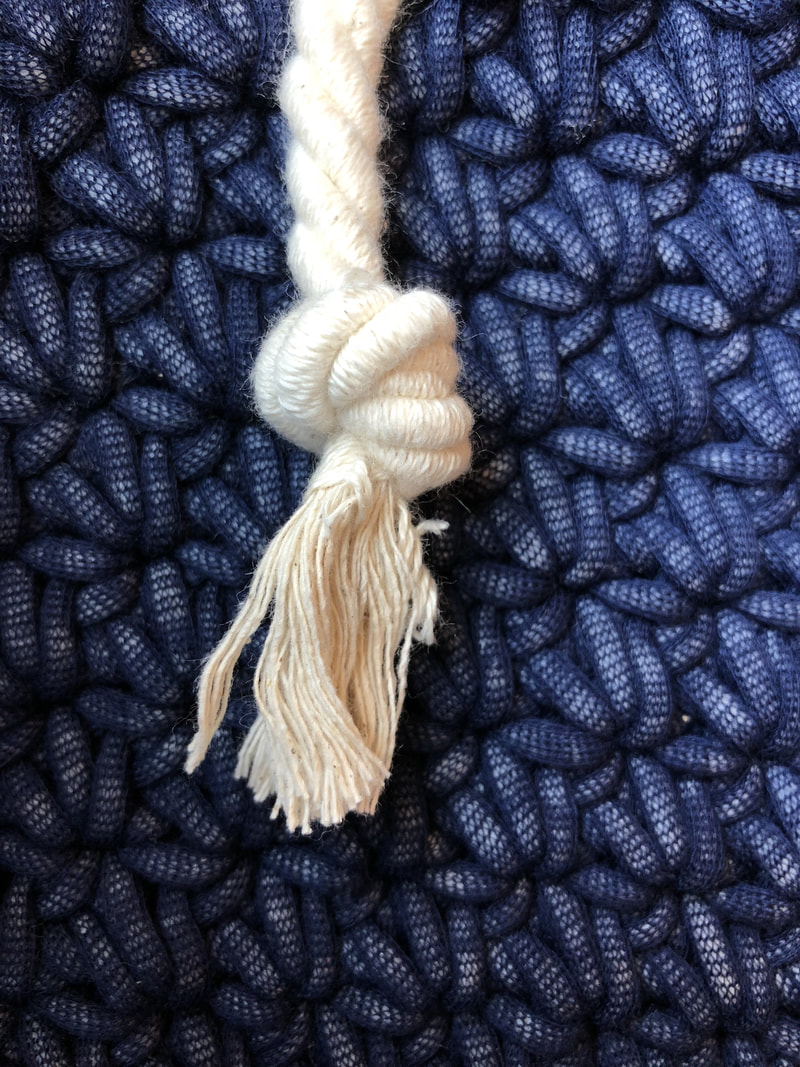
For the final step you will need the 3/8" rope. I also purchased mine at Joann. I had 2 yards cut and made 2 equal pieces 36" long. Thread one of the pieces from the inside of the bag to the outside of the bag through the grommet, tying a knot and leaving about 3 inches free at the bottom.
Cut the rope to about 1 and 1/2" below the knot. If you purchased rope like mine you can pull on the outside edges and unravel it. Do this on all sides to make a frayed effect.
Complete the last 2 steps with the other handle and the bag is complete!
I have been star stitch crazy lately! It’s such a fun stitch to work up. Check out my other star stitch pattern HERE
If you need to learn how to star stitch I recommend checking out Ami’s pattern for a star stitch pouch HERE Hot Pad #1
|


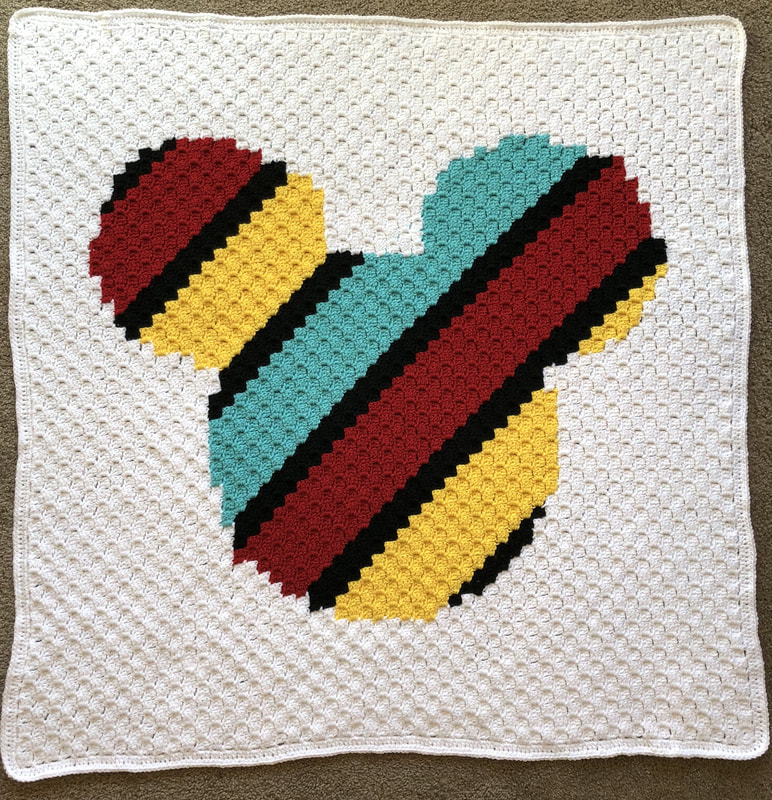
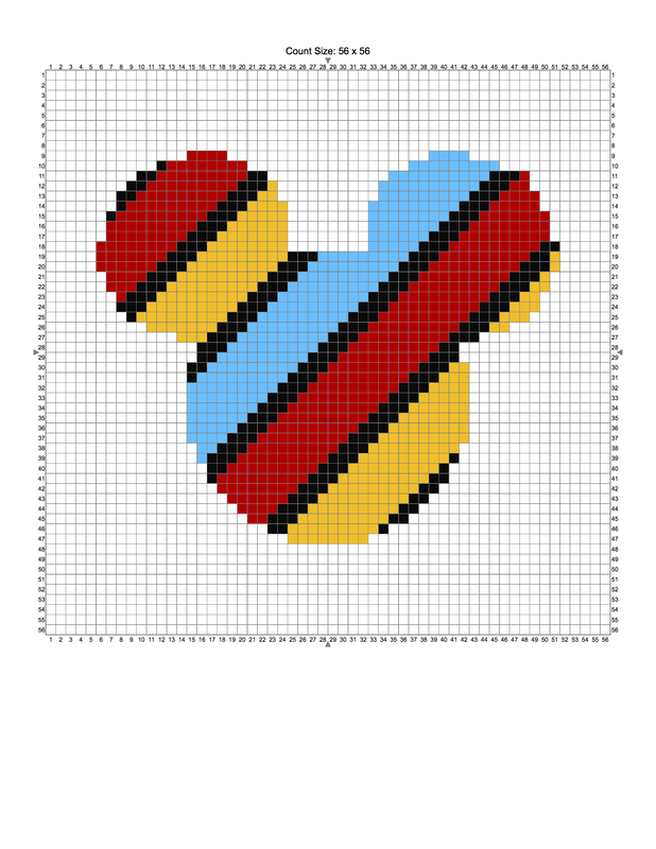
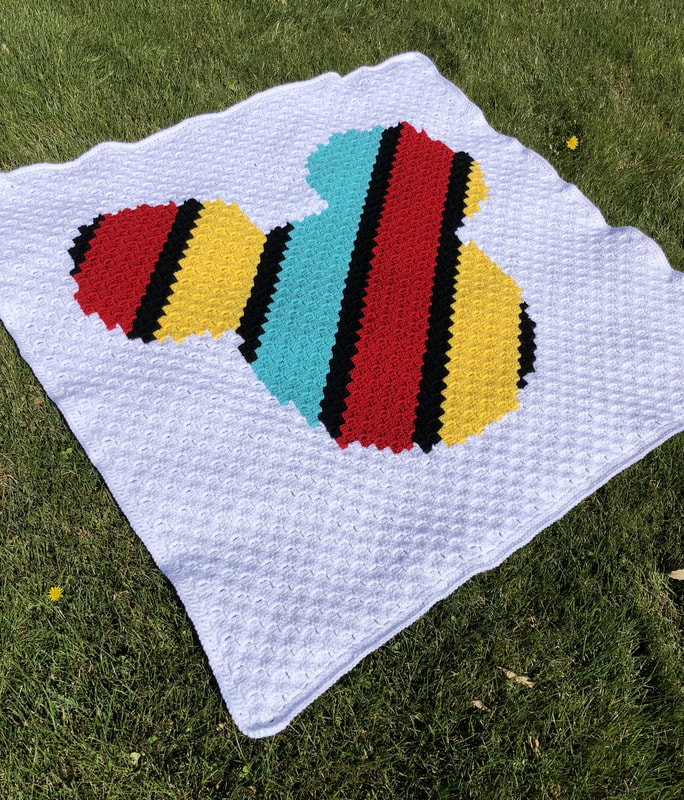 Just a little disclaimer that this is intended to be fan art. I am not endorsed by or affiliated with Disney | 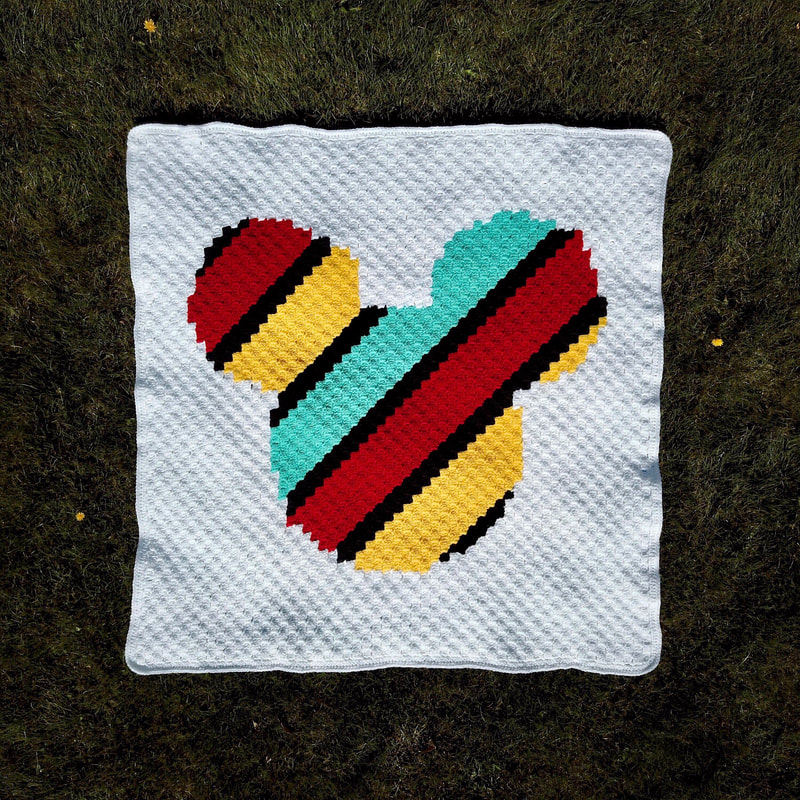 |
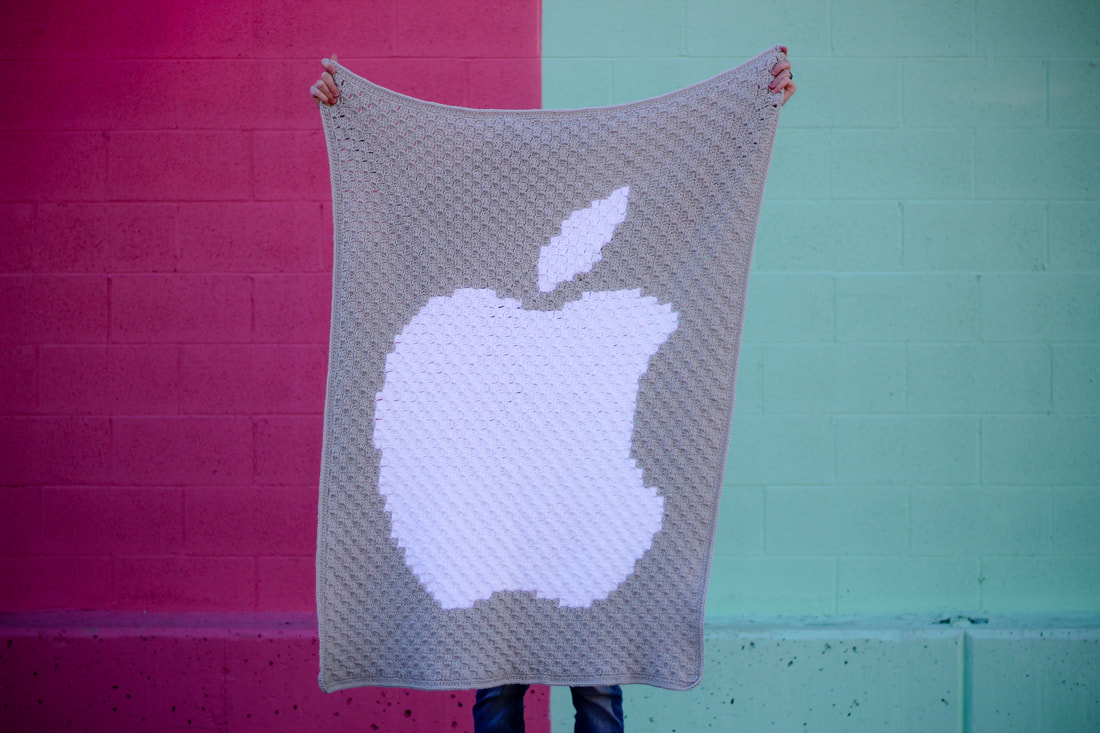
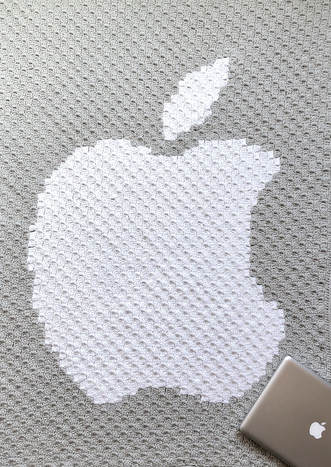
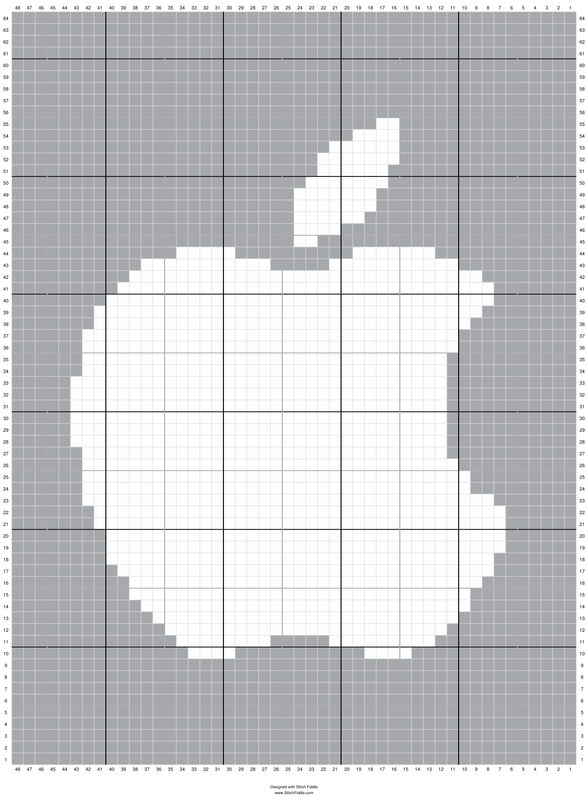
I finally decided I needed to get behind the C2C crochet craze! I have seen it everywhere! People are making some pretty incredible things! So I jumped in. I thought for DAYS about what I was going to do. I didn’t want my first blanket to have too many color changes since I was a newbie.
I’ve had this idea to crochet my husband an Apple blanket (he’s a huge fan!) for a long time but I never really knew the best way to go about it. Enter C2C. Only 2 colors and a super simple design.
I needed some help coming up with the right dimensions of the logo so I could make a pixel graph and make sure the blanket turned out the right size. So I recruited help from the biggest computer geek I know (the husband), gave him an idea of how I wanted it to look and how big I wanted it, and he used his wizard magic and designed me a perfectly sized apple logo!
I used stitchfiddle.com after we had the graphics designed to get the graph. I highly recommend it for any C2C project.
Lucky for you I’m totally willing to share the awesomeness so you can make one for the Apple fan in your life! (Find it at the bottom of the page!)
I used Hobby Lobby Yarn Bee Soft and Sleek in Grey and White. The same yarn I used for my most recent Baby Blanket
I’m kind of in love with the softness of this yarn. I ended up needing 6 skeins of Grey and 2 Skeins of White. Depending on how you crochet this could change a little for you.
I made it easy on myself and ended up not needing to cut any yarn tails by attaching a grey to each side and white in the middle like this:
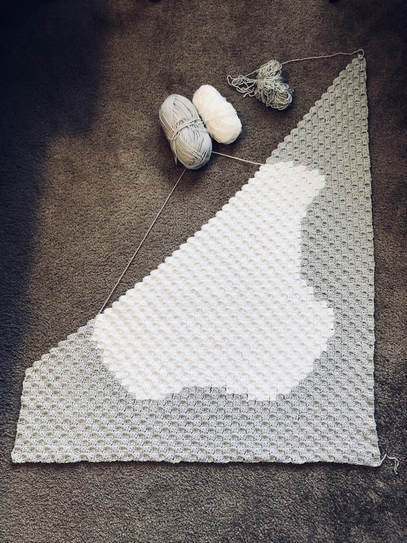
Once I got to the top leaf I did need to cut my yarn and reattach a few times but it only left me with a few ends to weave in at the end. I did a HDC border around and finished it off with a SC all the way around.
I am seriously blow away with C2C. It’s amazing how it all came together and I love the blanket (so does my husband, which is important since I made it for him. Ha!)
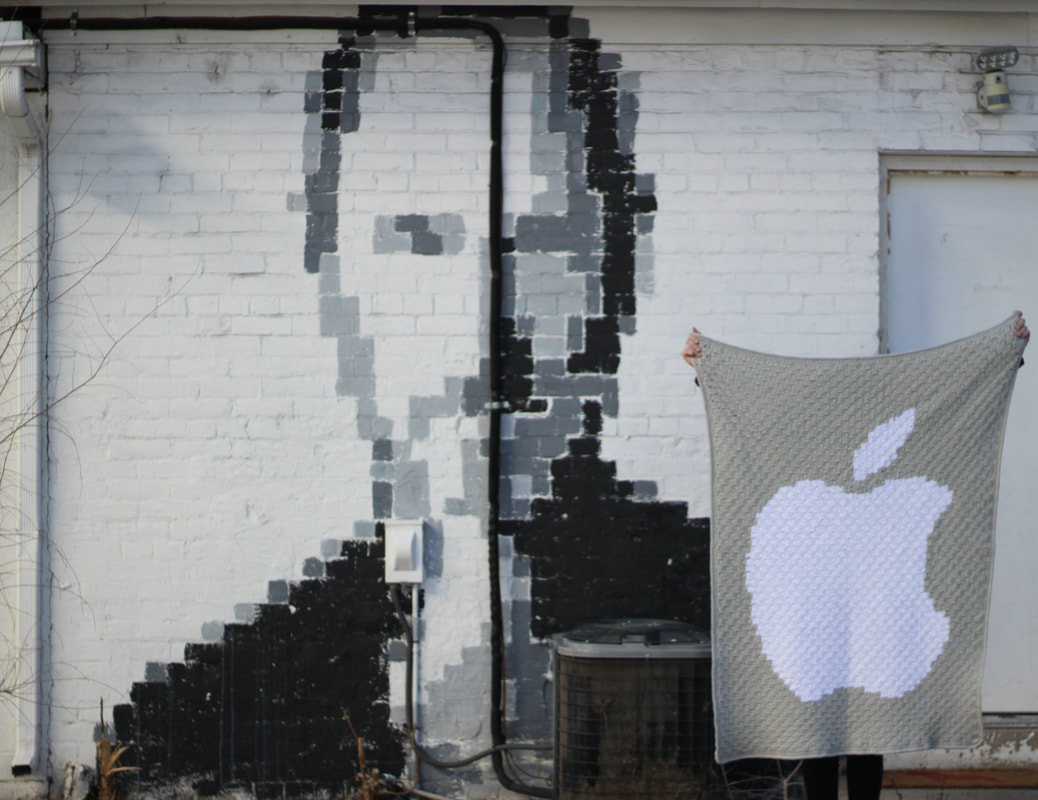
We have this cool building in our city with a bunch of famous peoples faces done in pixel art. Steve Jobs happens to be one of them so of course this photo was necessary.
The blanket turned out to be about 36x48 inches. The perfect lap blanket. Feel free to use the graph below.
I hope you enjoy! Happy Crocheting!
*Please note: this is strictly fan art. I am not affiliated with Apple.
|
|
I have a fun pattern for you today!
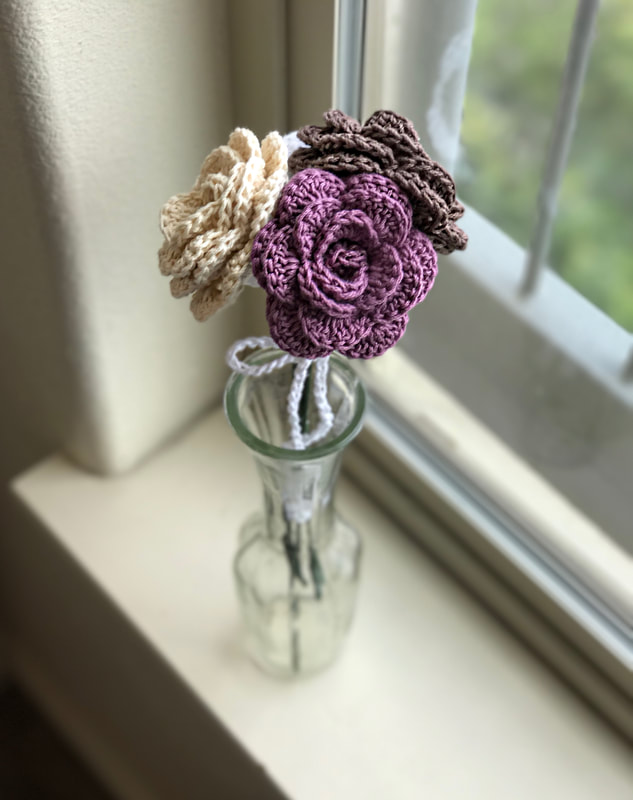
I spoke to my mom on the phone recently and she mentioned she was feeling tired and stressed as she has been working lots of overtime. I decided she needed a little sunshine in her life so I set out to send her something fun! I thought flowers would be just the ticket! Since we are multiple states away, sending real flowers wasn't really an option so crochet ones seemed like just the thing!
I quick search brought me to this fun pattern by Naztazia
I wanted mine to be on the smaller side since I had to mail them, so I didn't follow her instructions exactly.
To make them like I did you will need:

Lion Brand 24/7 cotton in colors Ecru, Lilac, Cafe Au La, and White
Purchase all colors from Amazon using the link below:
Size F (3.75mm) Crochet Hook
Floral Wire
Floral Tape
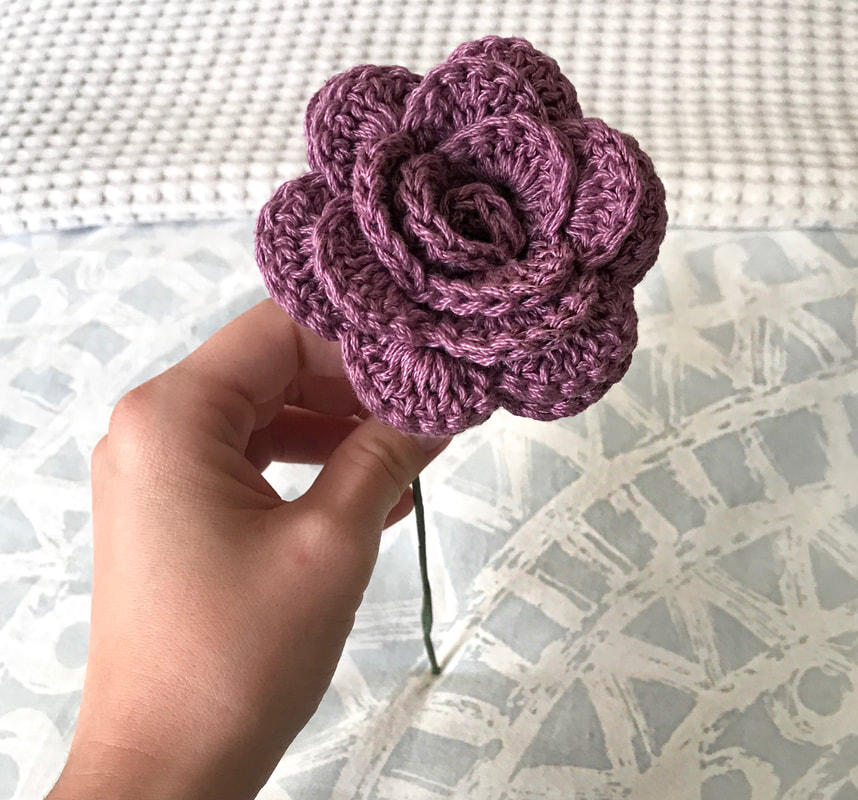
You can follow the instructions for the pattern HERE
After making all 4 flowers I grabbed my floral wire and folded it in half like this:
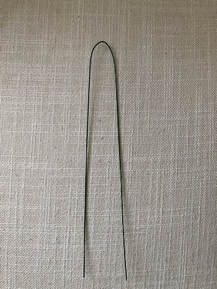
Insert it into the center of your flower and twist the 2 ends together to secure it. I twisted my ends all the way down to the bottom just to make sure it wouldn't slide out of the flower. I then used the floral tape and starting at the top wrapped the wire all the way to the bottom. Make sure you stretch it tight as you are wrapping so it sticks to itself.
I then grabbed my white yarn and chained about 100 chains and tied it around all 4 flowers in a bow.
Thats it! SO easy and I can tell you it will brighten anyones day! My mom was so surprised and so happy! She has the bouquet sitting in her front room :)
Happy Crocheting!
I then grabbed my white yarn and chained about 100 chains and tied it around all 4 flowers in a bow.
Thats it! SO easy and I can tell you it will brighten anyones day! My mom was so surprised and so happy! She has the bouquet sitting in her front room :)
Happy Crocheting!
|
|
|
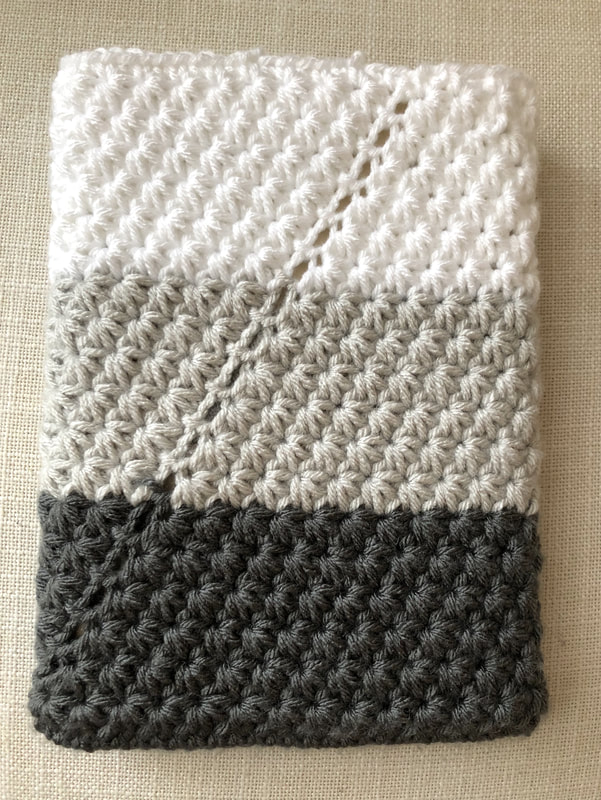
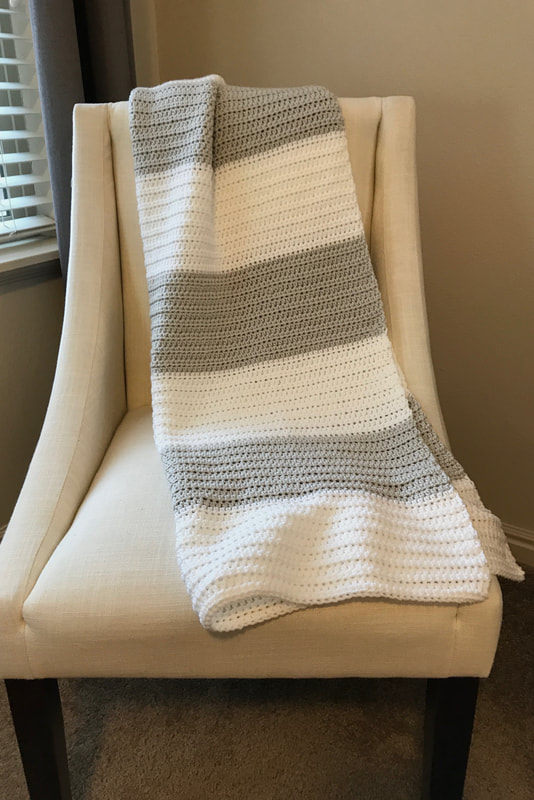
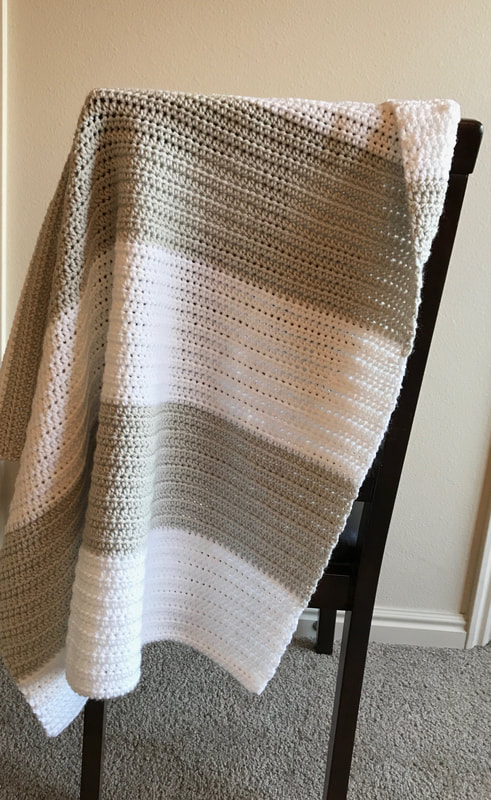
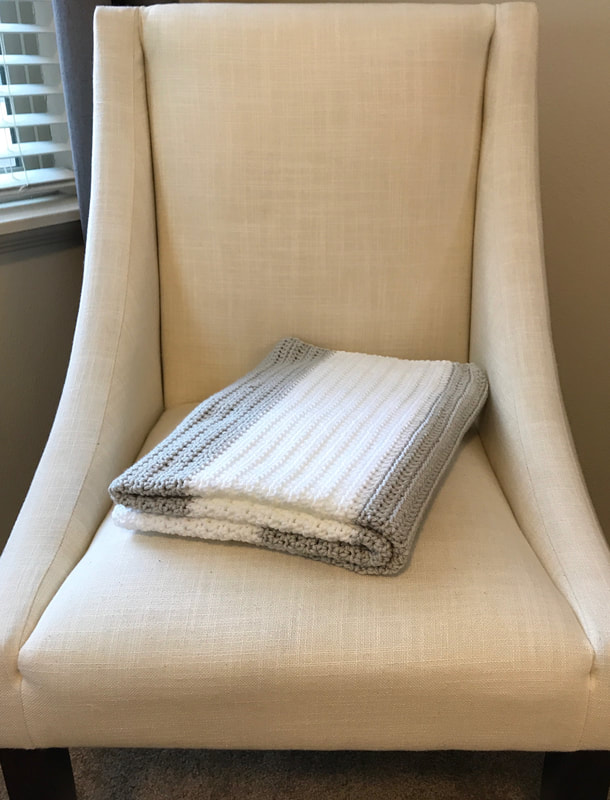
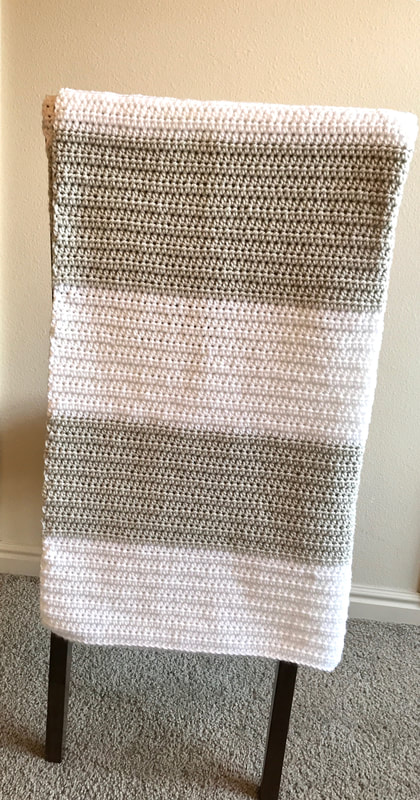
I have had a lot of requests for a simple baby blanket. After some thought I decided to give it a go. I wanted to create something super easy but also a little fun. This blanket only uses half double crochet stitches. It doesn't get any easier than that! It works up fairly quickly and doesn't take much concentration - my favorite kind of project (Hello Netflix and crochet!) :)
I chose grey and white for my blanket because its gender neutral and very much in style at the moment. Go crazy with any color combination you want! I think my next one is going to be lavender and white! Yarn Bee has quite a few color choices so theres lots of options.
I chose grey and white for my blanket because its gender neutral and very much in style at the moment. Go crazy with any color combination you want! I think my next one is going to be lavender and white! Yarn Bee has quite a few color choices so theres lots of options.
This blanket turned out for me to be about 32 inches by 42 inches. I used Yarn Bee Soft and Sleek from Hobby Lobby. This is the first time I have used this yarn and let me tell you, it is my new favorite yarn. It is ridiculously soft and gives amazing definition to the project.
Let's dive right in!
You will need:
Yarn Bee Soft and Sleek in Light Grey and White
3 balls of white and 2 balls of light grey
I (5.50 MM) crochet hook
Tapestry Needle for weaving in ends (optional)
To begin (with WHITE) chain 100
HDC in the 2nd chain from the hook, HDC across.
Continue to HDC back and forth in rows until you have 15 rows of white.
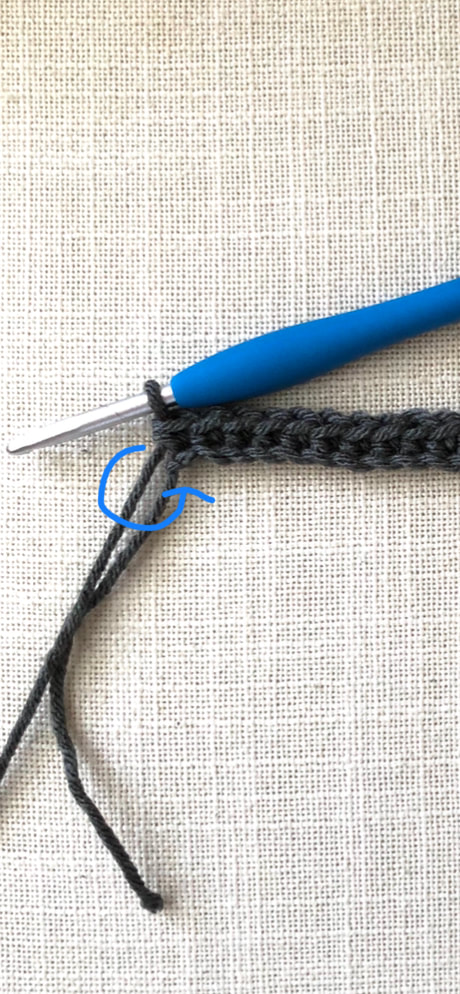
Switch to grey. Cut your white yarn leaving about a 6-8 inch tail. When you start crocheting with your grey leave a tail about the same length as the white before your first HDC. This allows you to tie the 2 tails together. Leave the tied ends hanging- you will come back to these later!
HDC 15 rows of grey, switch to white.
You will continue to crochet 15 rows of grey and 15 rows of white until you have 4 white stripes and 3 grey stripes. Your blanket should start and finish with white. Be sure you have 100 HDC's all the way across each row so your blanket has straight sides.
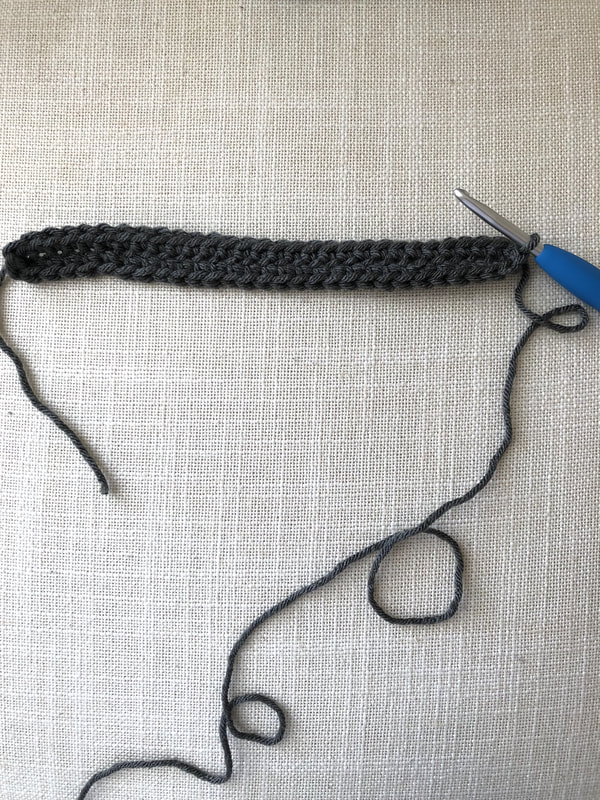
Tie off your white after your last HDC and grab your tapestry needle to weave in your ends. You will have a white and a grey tail at every block color change. Just be sure you are weaving in your ends into the right color block so they can't be seen.
And thats it! So easy and it looks and feels amazing!! Let me know what you think or if you have any questions in the comments below!
You will need:
Yarn Bee Soft and Sleek in Light Grey and White
3 balls of white and 2 balls of light grey
I (5.50 MM) crochet hook
Tapestry Needle for weaving in ends (optional)
To begin (with WHITE) chain 100
HDC in the 2nd chain from the hook, HDC across.
Continue to HDC back and forth in rows until you have 15 rows of white.
Switch to grey. Cut your white yarn leaving about a 6-8 inch tail. When you start crocheting with your grey leave a tail about the same length as the white before your first HDC. This allows you to tie the 2 tails together. Leave the tied ends hanging- you will come back to these later!
HDC 15 rows of grey, switch to white.
You will continue to crochet 15 rows of grey and 15 rows of white until you have 4 white stripes and 3 grey stripes. Your blanket should start and finish with white. Be sure you have 100 HDC's all the way across each row so your blanket has straight sides.
Tie off your white after your last HDC and grab your tapestry needle to weave in your ends. You will have a white and a grey tail at every block color change. Just be sure you are weaving in your ends into the right color block so they can't be seen.
And thats it! So easy and it looks and feels amazing!! Let me know what you think or if you have any questions in the comments below!
I have been crocheting my heart out lately and I just wanted to share my latest project with you. I just finished this adorable crochet beanie. It turned out absolutely perfect. I will definitely be wearing this for the rest of the winter.
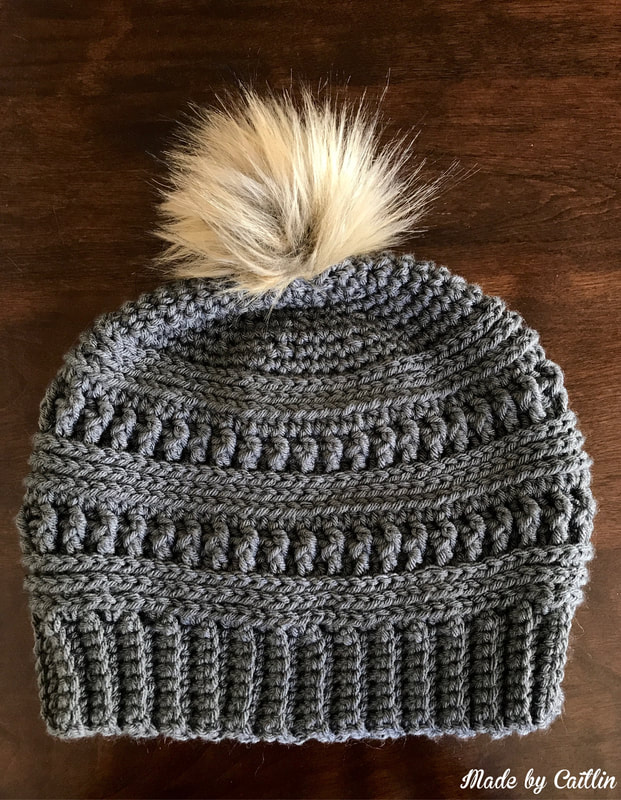
I found the pattern HERE go check it out and whip one up for yourself, you won't be disappointed. For my hat I used Yarn Bee Soft and Sleek from Hobby Lobby. It is so unbelievably soft and worked up perfect for this hat. Don't be afraid of the fur pom pom. It was seriously the easiest thing I have made! You can find the instructions for it on the same page as the pattern! I hope you enjoy it!
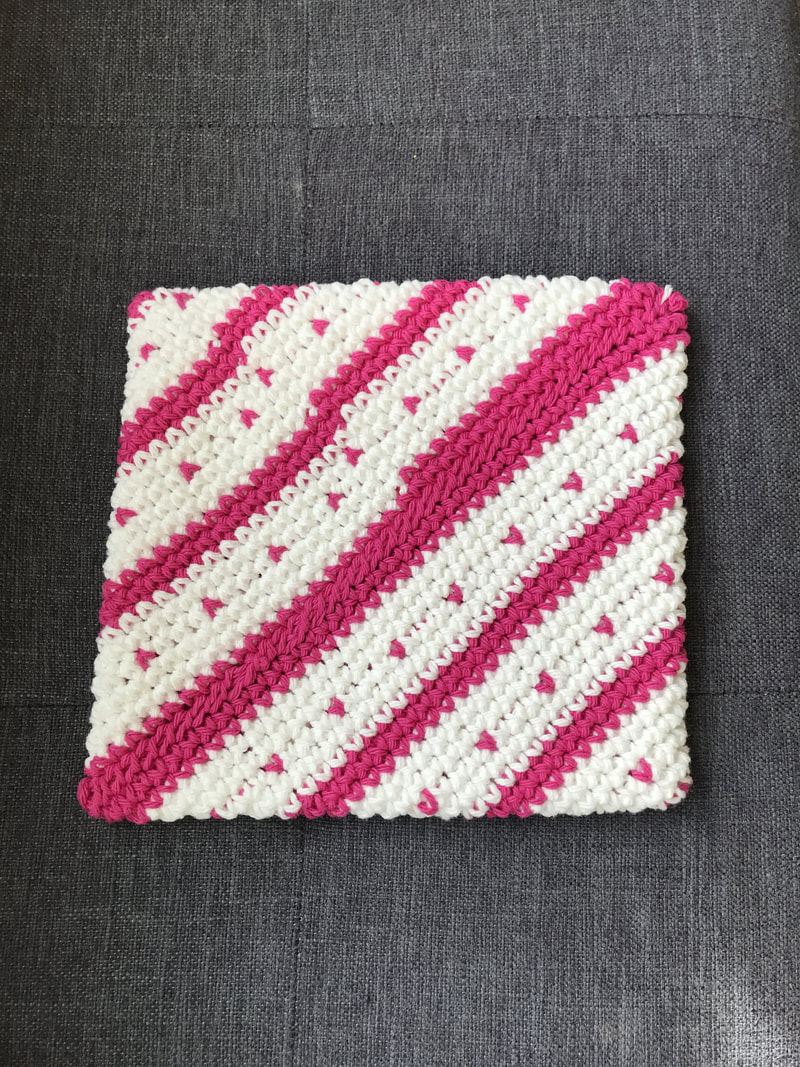
Valentines Day always means a fun little crochet project for me. I just whipped this up and i'm excited to share it with you. This is a double thick pot holder crocheted to be folded diagonally.
I took notes as I went along and took some photos, I didn't create an exact pattern for this so I will do my best to explain how I did it. This project is crocheted in the round, I didn't count any of my stitches because it is not necessary. A lot of this project is eyeballing what you think looks best. Thats the fun in crochet! :)
You will need:
2 balls of cotton yarn ( I used Peaches and Cream in pink and white)
Size H crochet hook
Yarn Needle (for sewing together at the end)
Lets get started!
You will need:
2 balls of cotton yarn ( I used Peaches and Cream in pink and white)
Size H crochet hook
Yarn Needle (for sewing together at the end)
Lets get started!
Beginning with PINK chain 40
Single crochet 3 in second chain from the hook
1 SC in each chain until you reach the last chain. Place 3 Sc in the end chain.
Instead of working back and forth in rows this pattern is worked in rounds. You are now going to SC along the bottom chains of your work. Its going to feel upside down (because it is) but it works out, so don't worry. The picture below shows my work after SC 3 in the last stitch. The next crochet space is the "bottom" stitch on the far left. You are rotating your work so the bottom is now on the top.
SC along bottom chain and around the corner until you have your work right side up again. This is where you will switch to white.
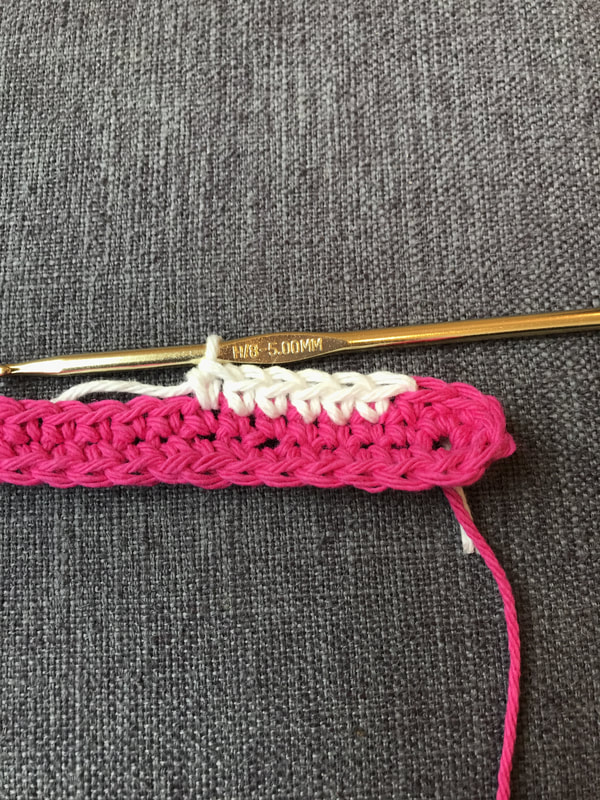
Drop your pink yarn and leave it right where its at. You will be dropping and picking up your yarn in this spot all through this project. You will know you have completed your rounds when you make it back to your dropped yarn.
Crochet 2 rows of white. Because you are working in rounds your project won't line up perfectly. This is where your eyeballing comes in. Stop where you think the next pink will line up with the pink row below it.
Now is a good time to point out this project is very one sided. Unless you'd don't mind the back side lining up perfectly. Thats the fun in working in rounds with stripes. Here's picture of the "back" of mine. Because this is a pot holder and will most likely sit on my table with a hot bowl on top of it, or hanging near the stove, I didn't worry too much about my back side not lining up perfectly. I also ended up with half a row of extra pink in there. See if you can catch that. Don't do it on yours ;)
After your 2 rows of pink, switch to white.
SC 2 white rows
*Note* Your project will want to curl the "wrong" way where you feel like you are crocheting on the inside, after a few rows go ahead and curl it the other way so you are crocheting on the outside of your project.
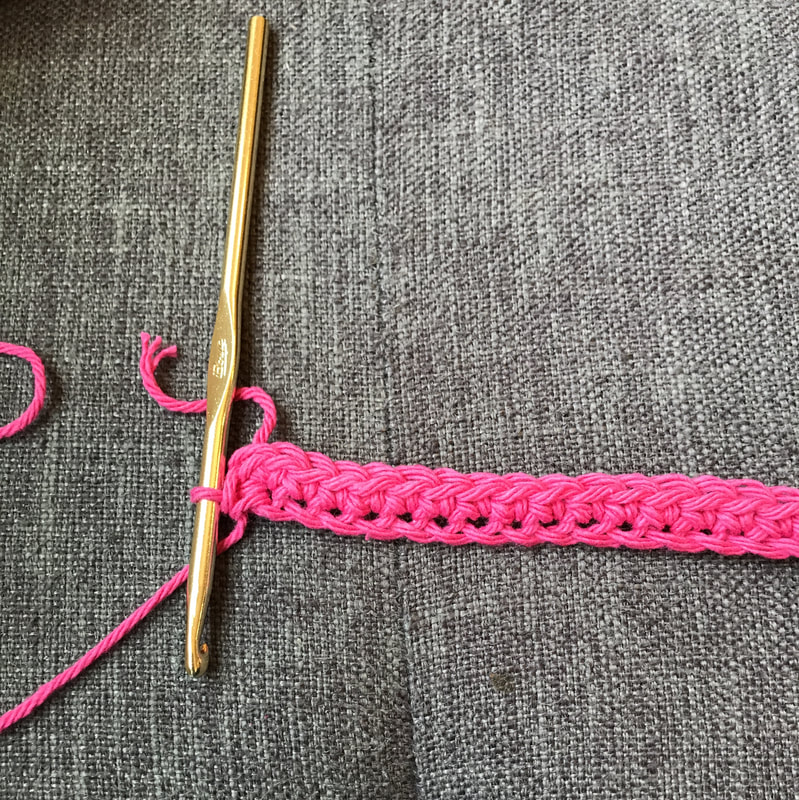
After your second row of white you will start your white heart row. The "heart" is done by holding both strands of yarn with the pink sitting evenly with your working stitches. Insert your hook into the stitch and pull up pink. Drop your pink yarn and finish off the stitch in white. Try to refrain from pulling your pink tight. You want it loose to get the stitch to pop. There is a great tutorial HERE for this specific stitch if you are having trouble with it.
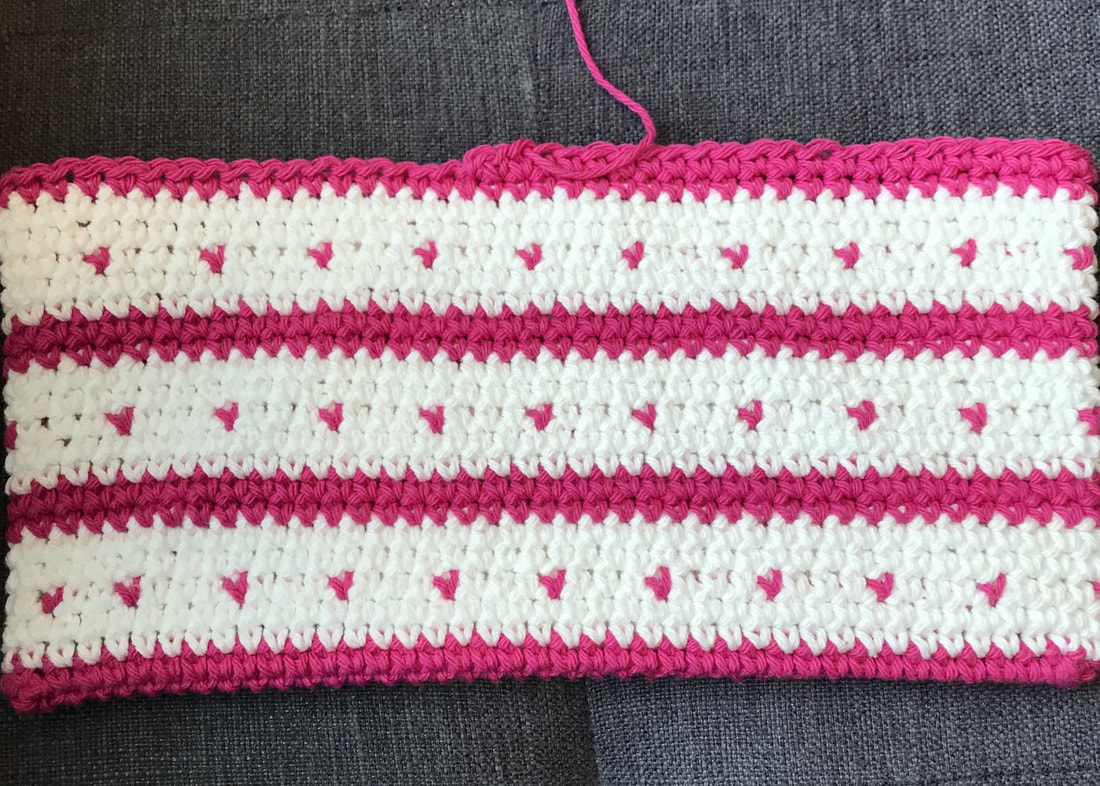
You will carry your pink yarn across the entire row of "hearts" and pick it up only when its needed. Crochet 3 white SC and 1 pink heart stitch. Continue this pattern for one round.
Drop your pink and SC 2 rounds of white. At this point you should have 5 rows or "rounds" of white with the 3rd round being your heart stitches.
SC 2 white rows
*Note* Your project will want to curl the "wrong" way where you feel like you are crocheting on the inside, after a few rows go ahead and curl it the other way so you are crocheting on the outside of your project.
After your second row of white you will start your white heart row. The "heart" is done by holding both strands of yarn with the pink sitting evenly with your working stitches. Insert your hook into the stitch and pull up pink. Drop your pink yarn and finish off the stitch in white. Try to refrain from pulling your pink tight. You want it loose to get the stitch to pop. There is a great tutorial HERE for this specific stitch if you are having trouble with it.
You will carry your pink yarn across the entire row of "hearts" and pick it up only when its needed. Crochet 3 white SC and 1 pink heart stitch. Continue this pattern for one round.
Drop your pink and SC 2 rounds of white. At this point you should have 5 rows or "rounds" of white with the 3rd round being your heart stitches.
Drop your white and pick up pink. Crochet 2 rounds of pink.
On your next round of hearts make sure the line up with the heart from the previous row to keep everything looking uniform.
Continue the pattern until you have something that looks a little like this (see photo below) You should have 4 rows of pink and 3 "sections of white. Don't tie off your yarn yet, you still need it!
This is now where you will do a little magic trick to turn this into a hot pad. I have taken a few photos to show how its done.
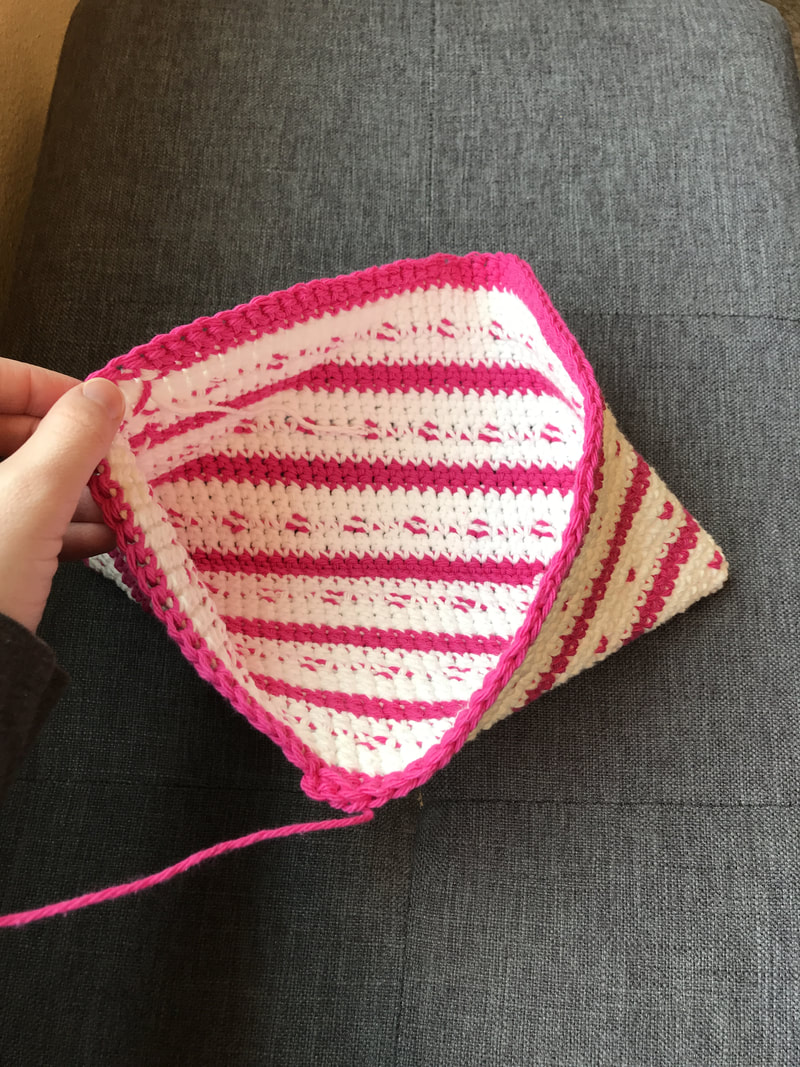
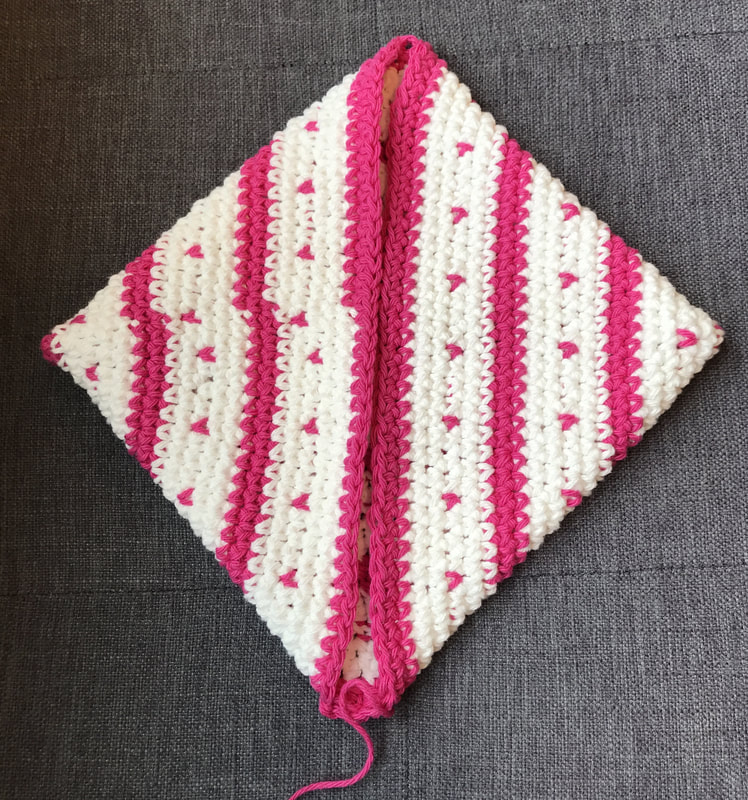
Cut off a long piece of pink and grab you yarn needle. Whip stitch through the 2 top pink rows to sew your hot pad together. Weave in your ends and you're done!
I hope you enjoyed this! Happy Crocheting! :)
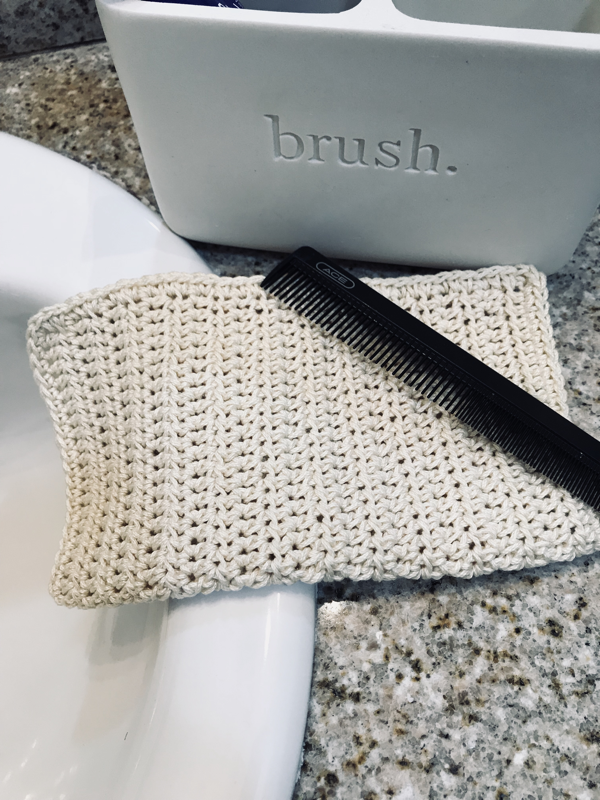
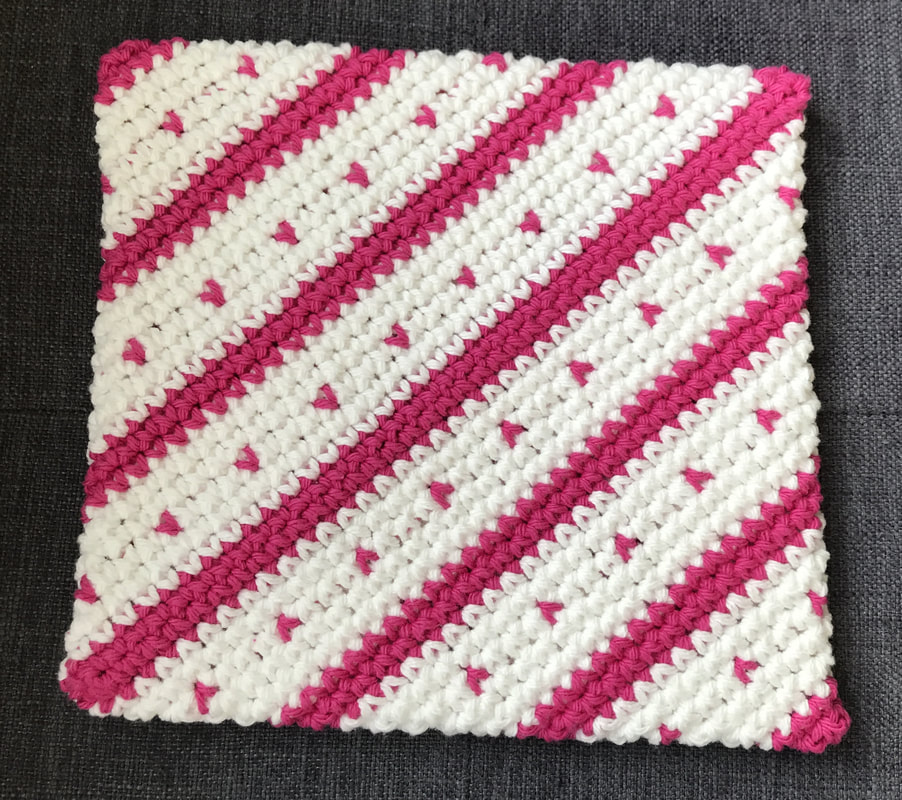
I decided I needed a washcloth for my bathroom to go along with all the washcloths in my kitchen. I found Lion Brand 24/7 cotton a few months ago and I knew it was the perfect pick for this project. It’s stretchy and gives off this lacy look to go well in the bathroom. Not saying you couldn’t use this in your kitchen, you definitely can, but I love it on my makeup counter in my bathroom.
Its basically the same pattern as my other two cloth patterns, just changed a bit since this yarn is thinner and lighter. Enjoy!
Its basically the same pattern as my other two cloth patterns, just changed a bit since this yarn is thinner and lighter. Enjoy!
Lion Brand 24/7 Cotton
Size F crochet hook
TERMS:
HDC - Half Double Crochet
SC - Single Crochet
Chain 32
Row 1: HDC in 3rd chain from hook and in each chain across (30)
Chain 2, (does not count as first HDC) turn
Row 2-24: HDC in each chain across, Chain 2;: turn.
You are just going back and forth across the cloth until you have 24 rows.
Note: If you’d like a longer cloth keep going! The great thing about this pattern is it’s simplicity. Add as many rows as you’d like to get the look you want.
Do not fasten off when you finish the last row. You will now be adding a single crochet border around the outer edges. Beginning in the last single crochet from row 24, SC 2 in the corner stitch. Rotate your work to crochet down the left side of the cloth. SC in each space all the way down. This doesn’t have to be perfect. You kind of have to try and get every space, just make sure it’s even all the way down so it doesn’t bunch.
SC 2 in the corner spot. Rotate your work again and SC across the bottom. SC 2 in the corner and turn to go up the side. SC 2 in the corner and finish off with SC across the top. Fasten off and you’re done!
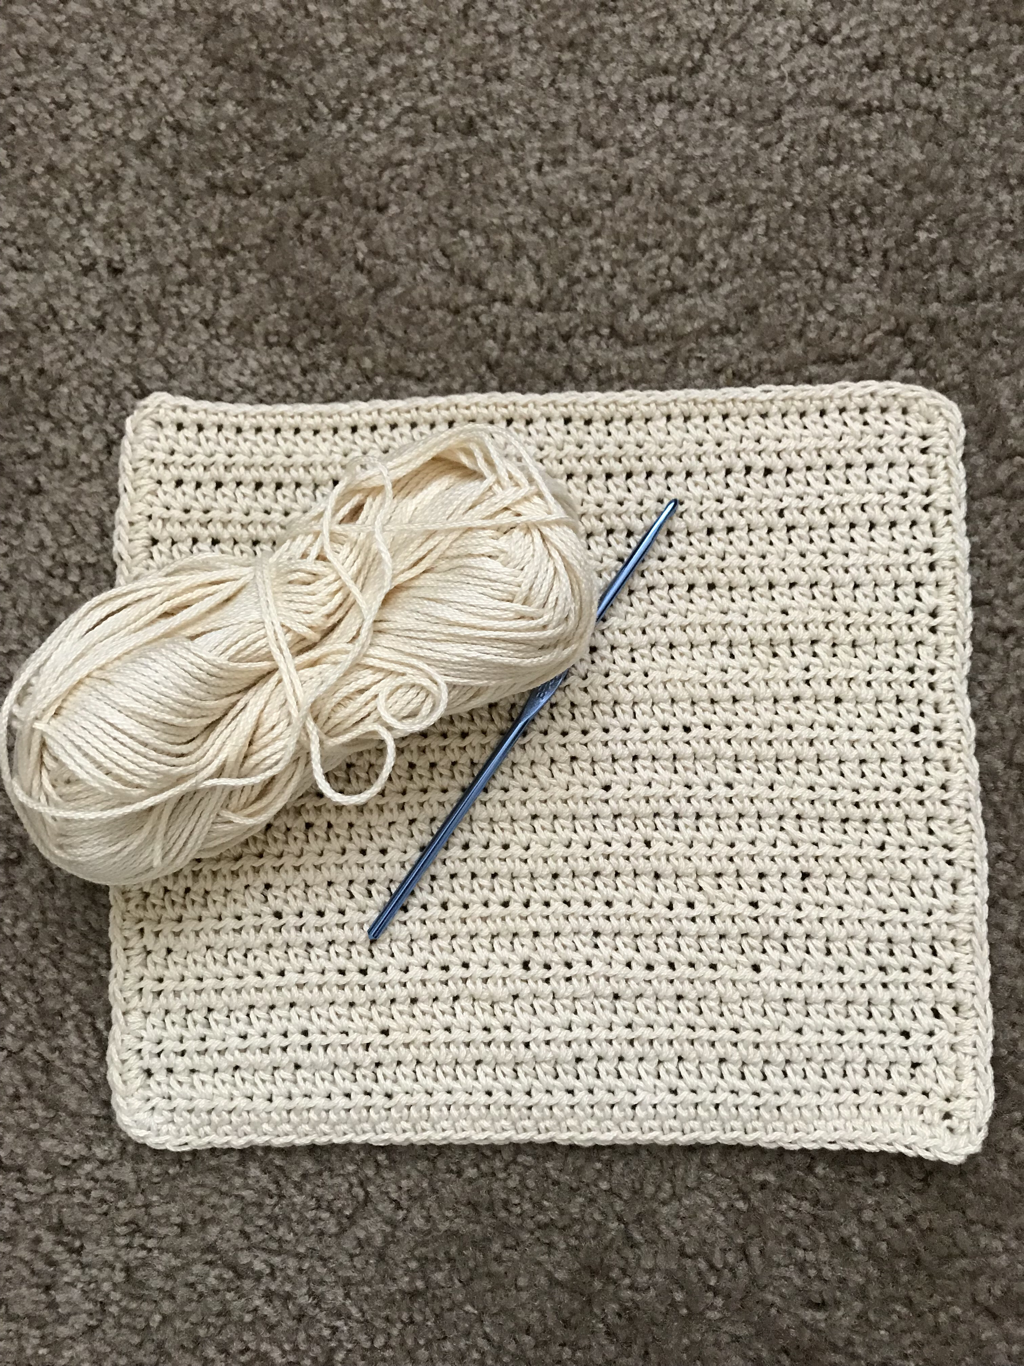
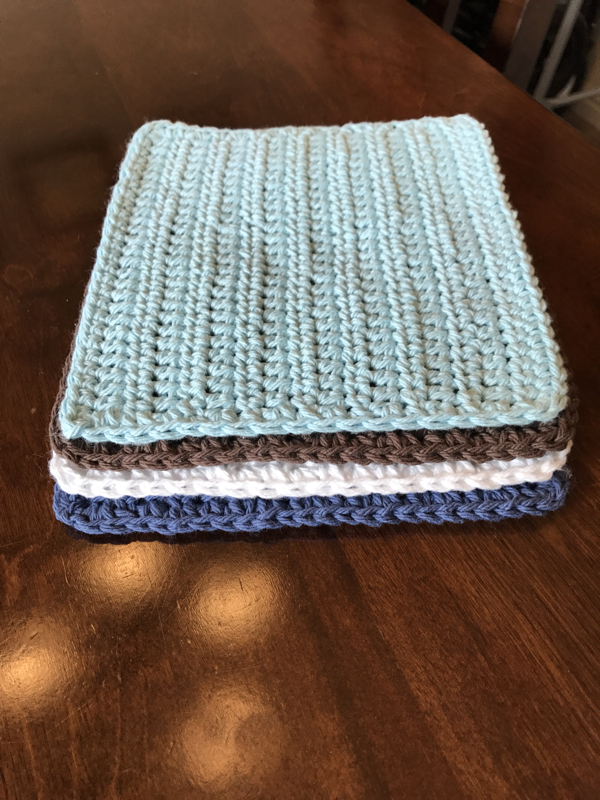
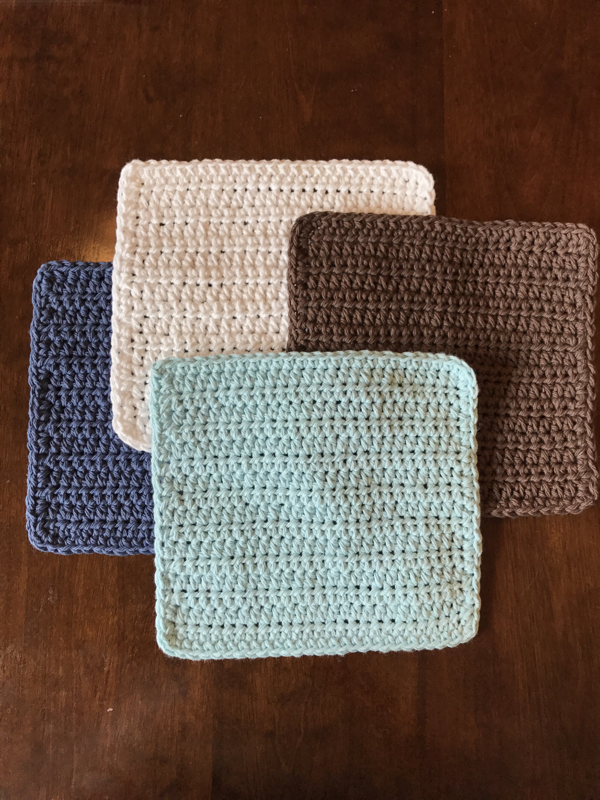
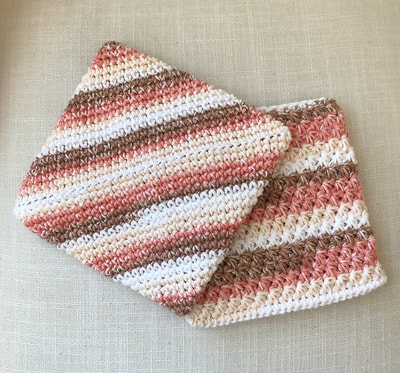
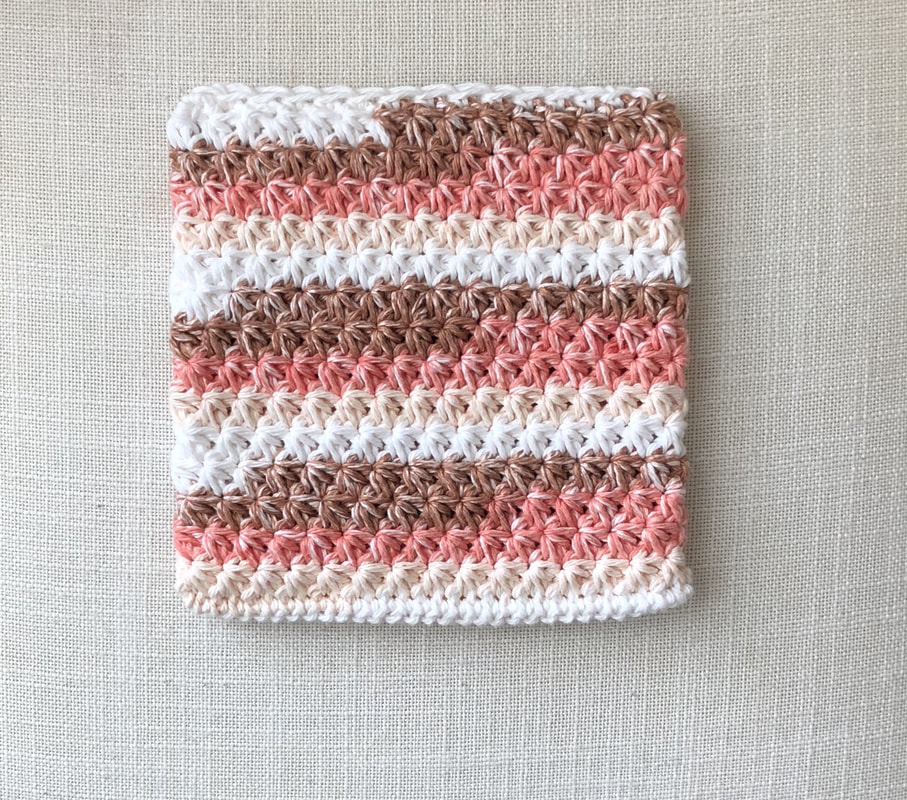
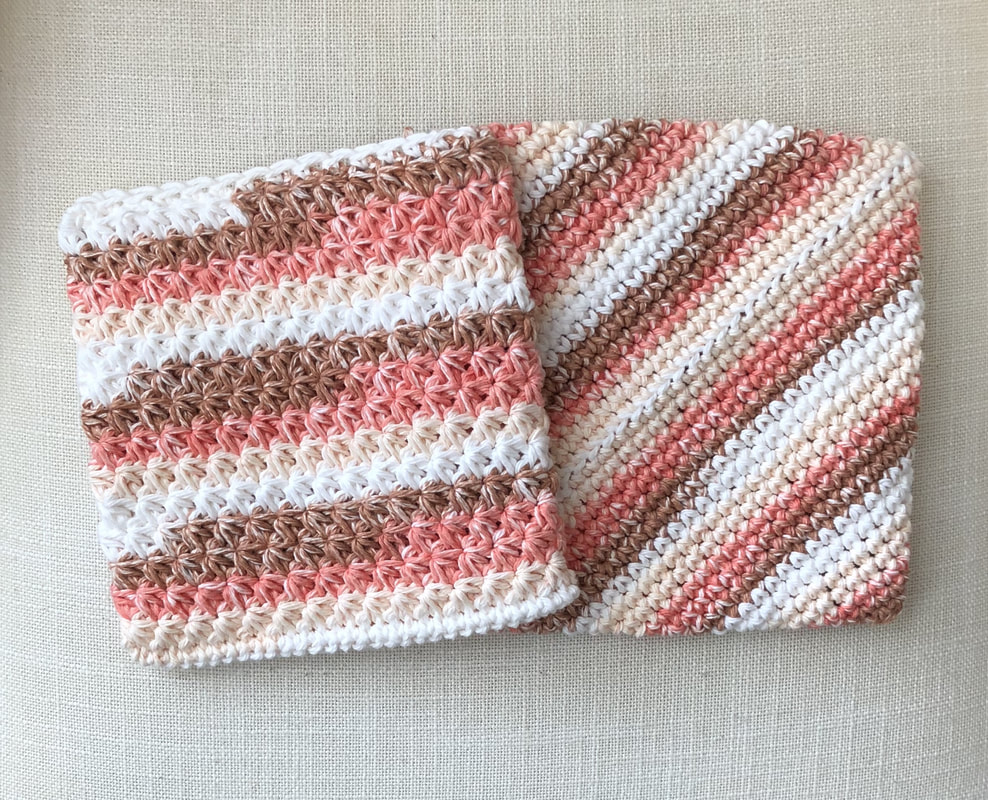
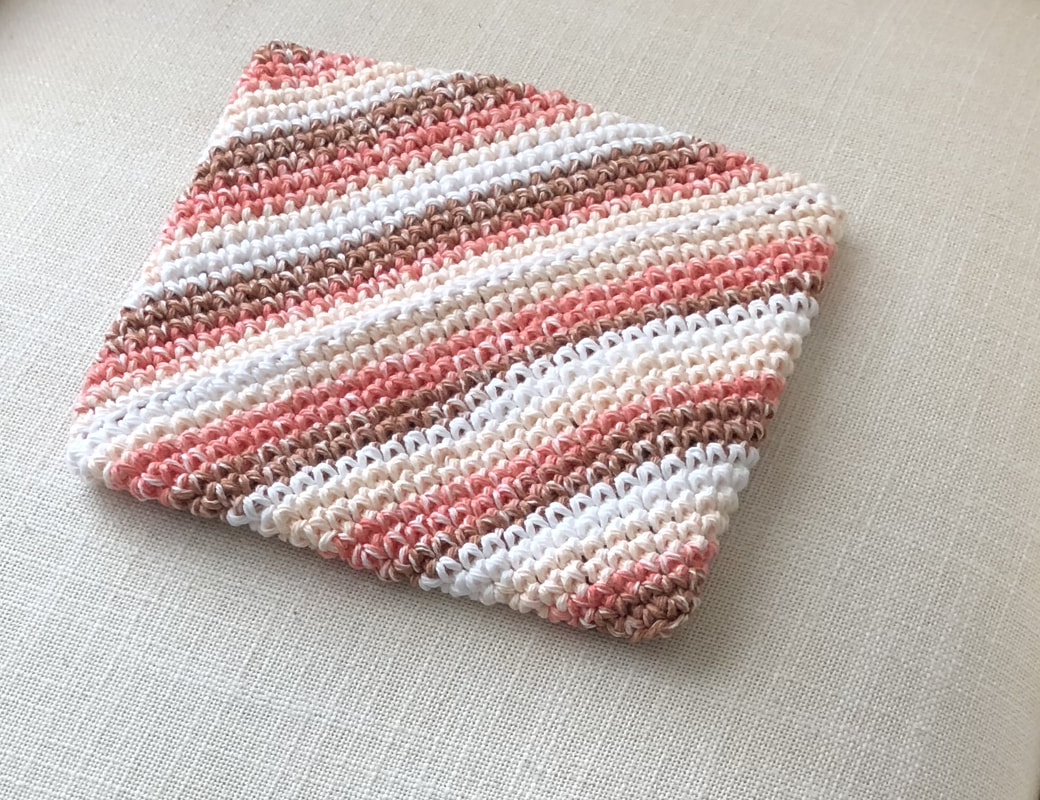
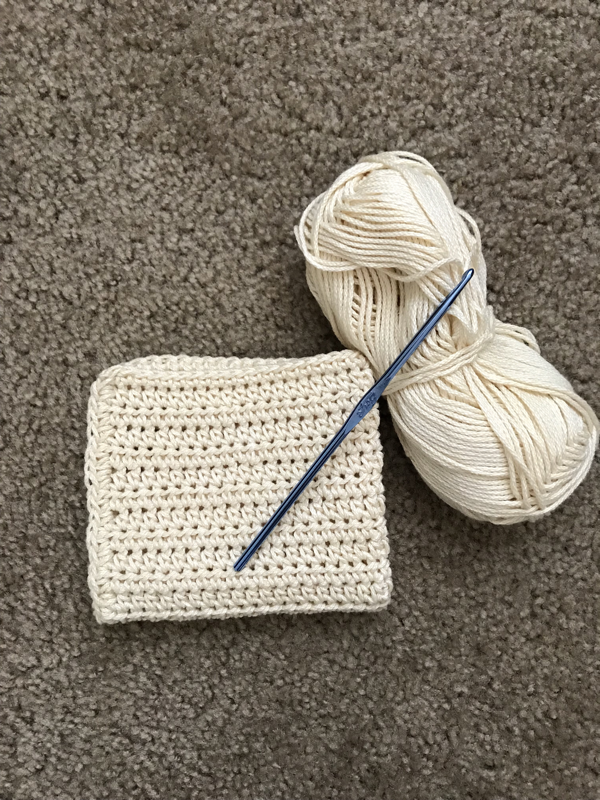
I have had quite a few people asking for a slightly larger version of my popular dishcloth so decided to do a little refresh on the old pattern. I have made a few changes and added some more photos to help you along the way. I also whipped up a quick bunch for a gift and added some photos of that for you as well. This is such an easy project. Enjoy!
If you would like to purchase an inexpensive ad-free, printable version of this pattern please visit my Etsy shop by clicking HERE
If you would like to purchase an inexpensive ad-free, printable version of this pattern please visit my Etsy shop by clicking HERE
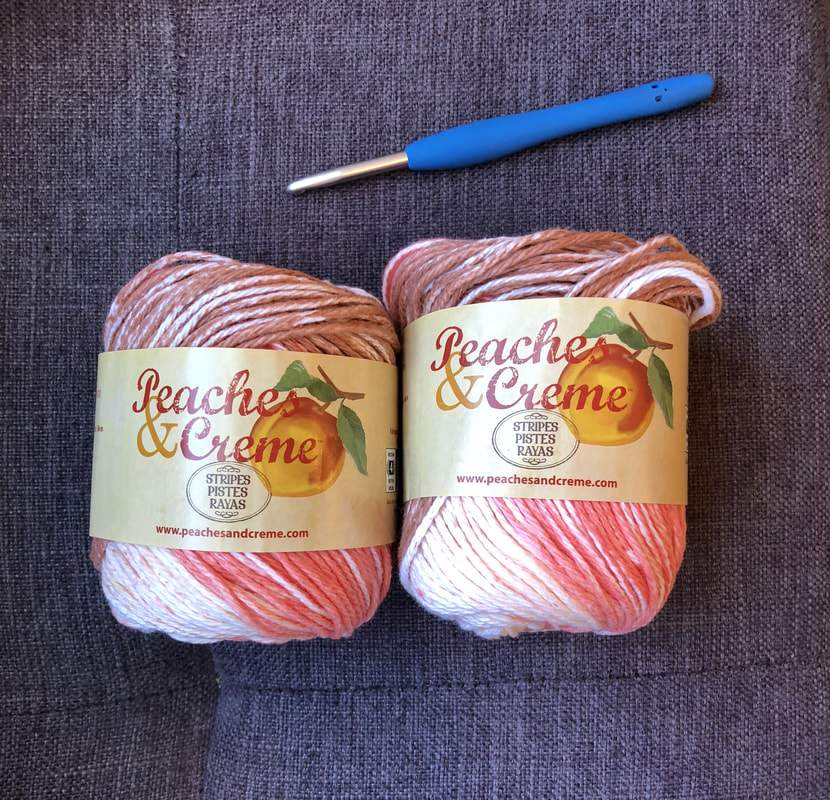
You will need:
- 1 skein cotton yarn. I used Peaches and Cream
- Size H crochet hook
Just a quick note: If you'd like to make a whole bunch of these cloths to give away as gifts I recommend purchasing a larger amount of yarn. Lily Sugar 'N Cream comes in a huge ball and will make quite a few cloths! You can purchase using my Amazon link below.
So lets get started!
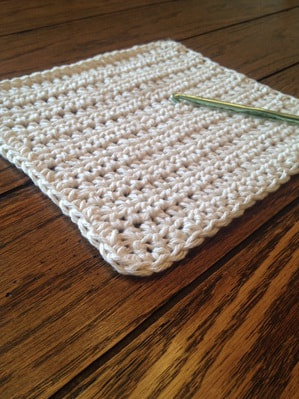
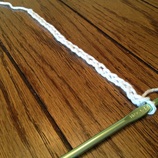
Start with a chain of 27
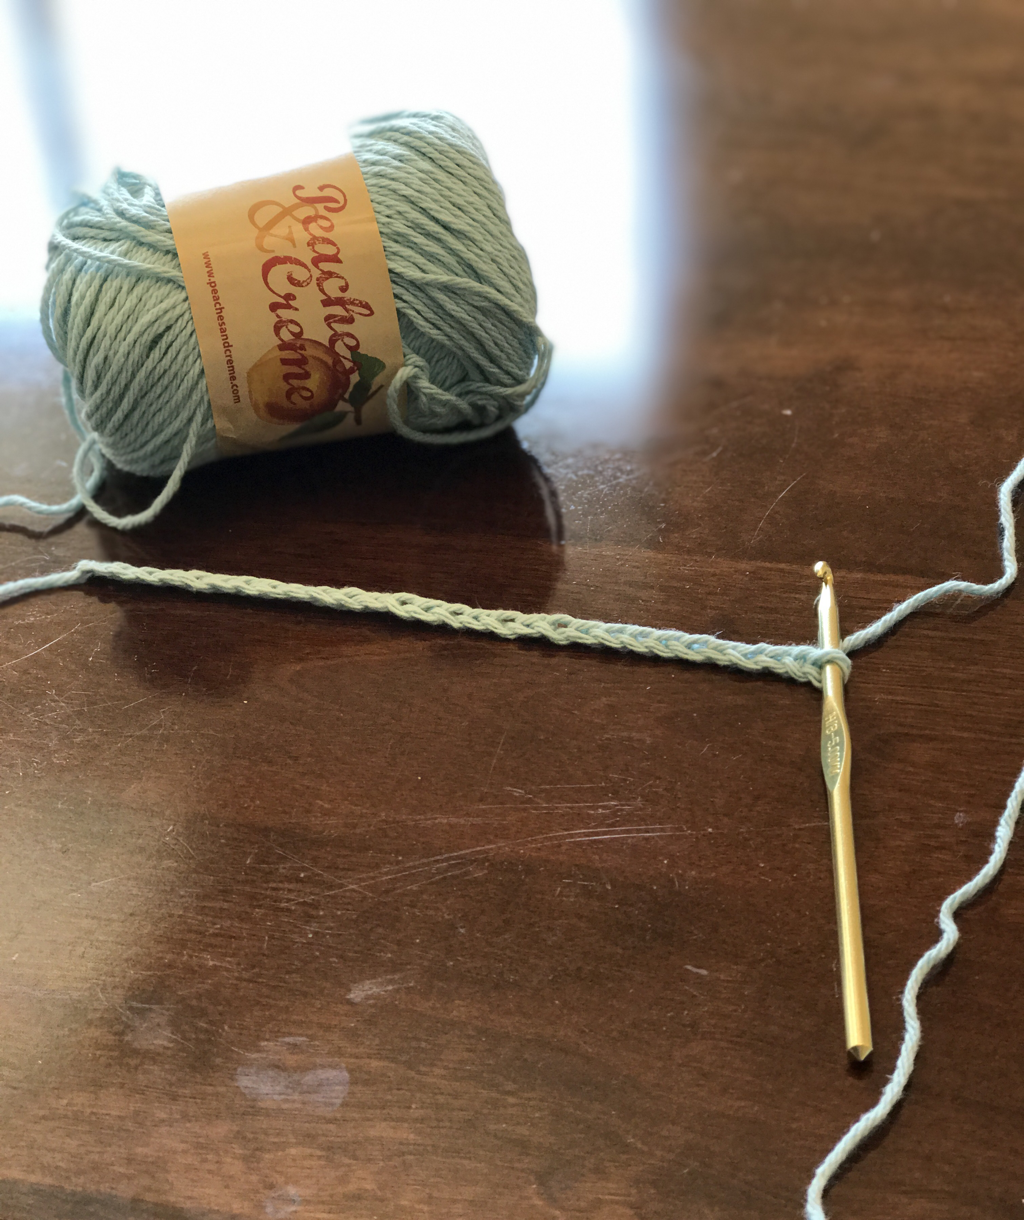
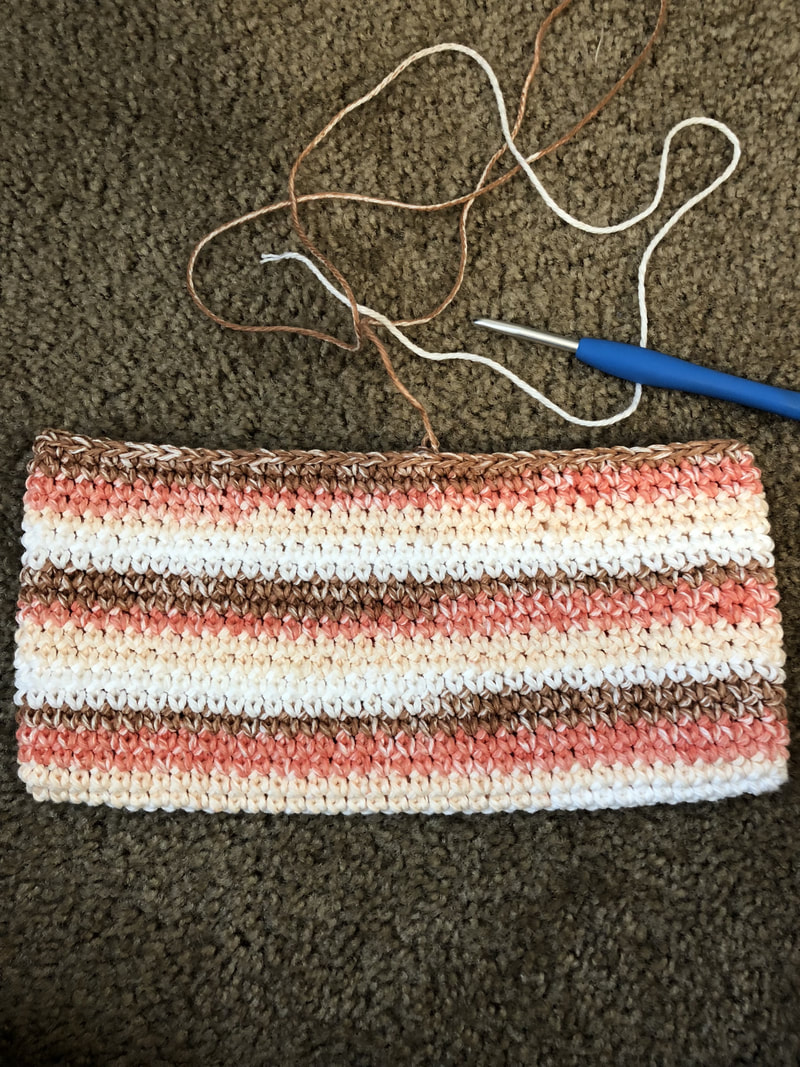
(HDC) Half Double Crochet in the 3rd chain from the hook. Continue with HDC to the end (You should have 25 stitches across.)
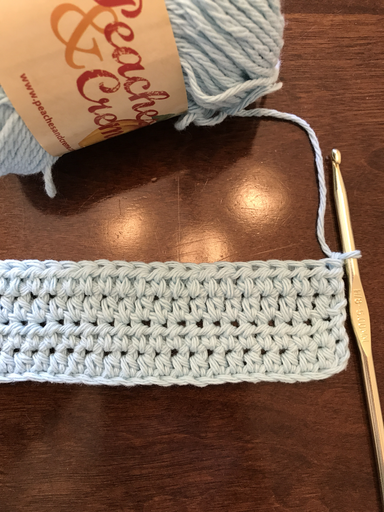
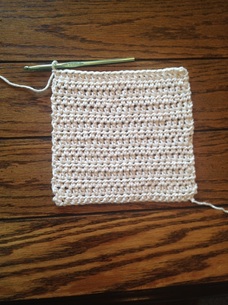
Chain 1 and turn your work. HDC 25 times, Chain 1 and turn your work. Continue until you have 16 rows total. (Do not fasten off!)
Chain 1 and turn your work. HDC 25 times, Chain 1 and turn your work. Continue until you have 16 rows total. (Do not fasten off!)
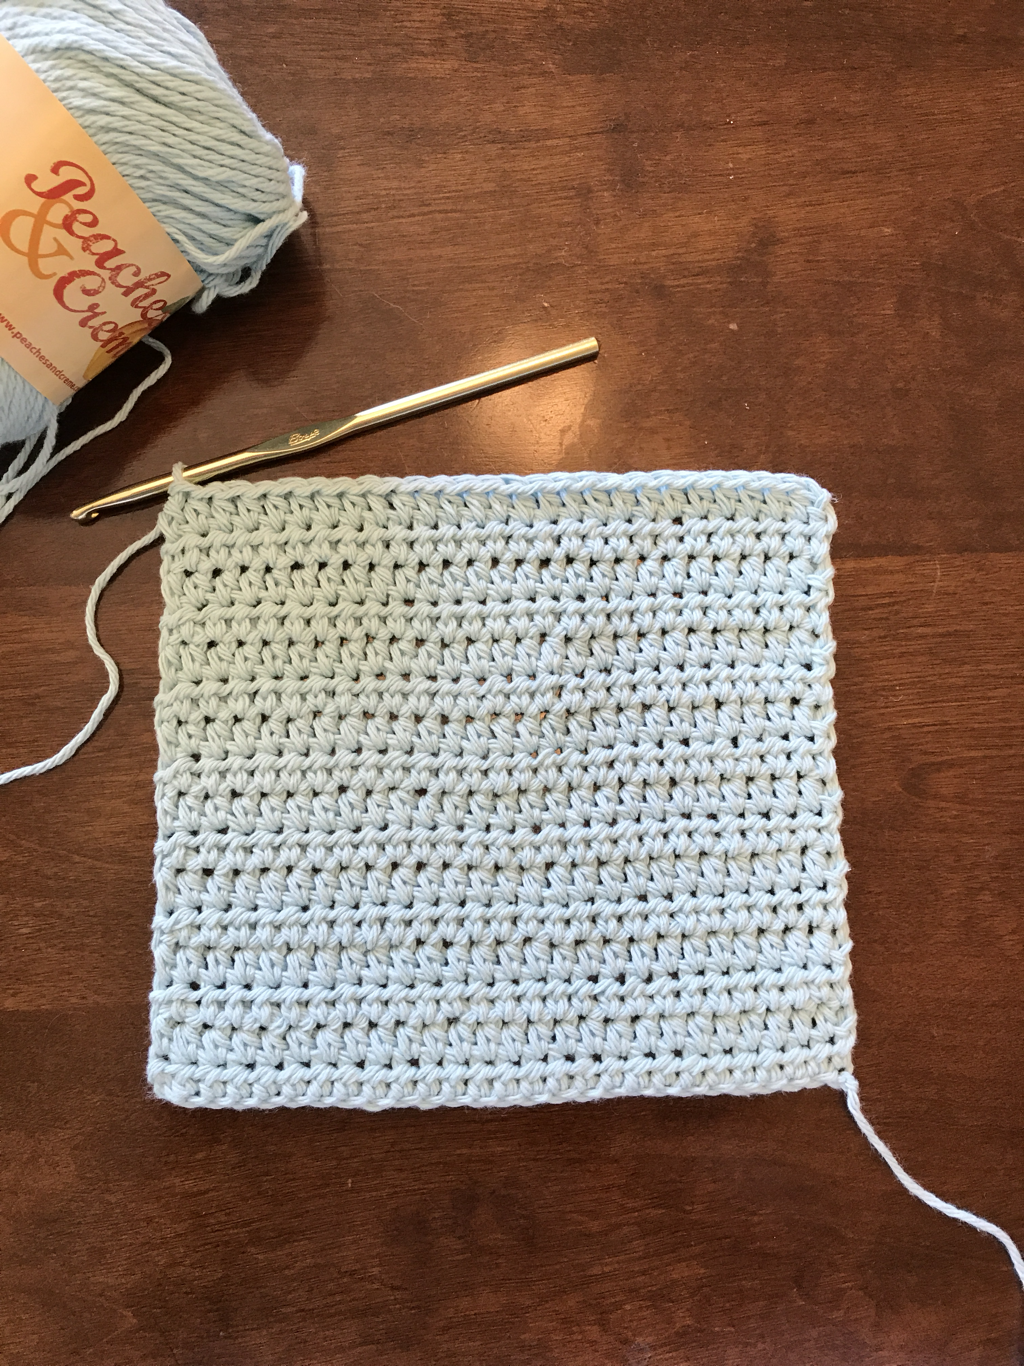
You are now going to add a single crochet row around all 4 sides of your cloth to give it a little finish.
Start by putting one single crochet in the last stitch you completed.(See photo for reference) Rotate your cloth so you can crochet down the left side.
|
|
Single Crochet in each space down the side. It doesn't have to be exact, just make sure its all even as you go down or your cloth will bunch. I try to do one stitch in each space all the way down. Some of the spaces are wider and longer than others but it works itself out as you go along.
Single crochet 2 at the end of the row (in the corner). This gives your cloth the square look.
Rotate your work again and single crochet along the bottom in each chain.
Single crochet 2 in the corner stitch and rotate your work again to single crochet along the right side of the cloth.
Don't forget your 2 single crochets in your corners and rotate to finish the final side of the cloth. Slip stitch to the beginning (where you started your border) and fasten off your work. You're done!!
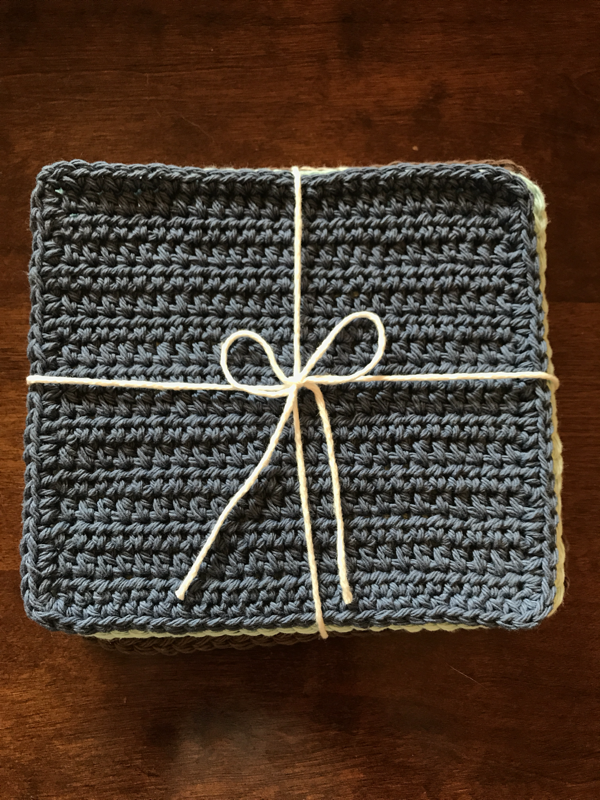
These cloths make really great and easy gifts. I tried a few different ways of putting them together and I like both. During the holidays you can buy some festive colors and give them away as neighbor gifts!

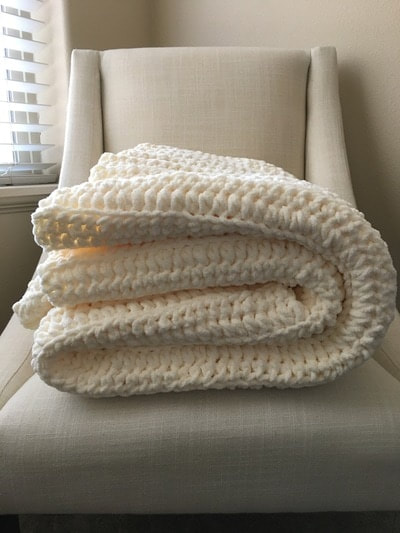
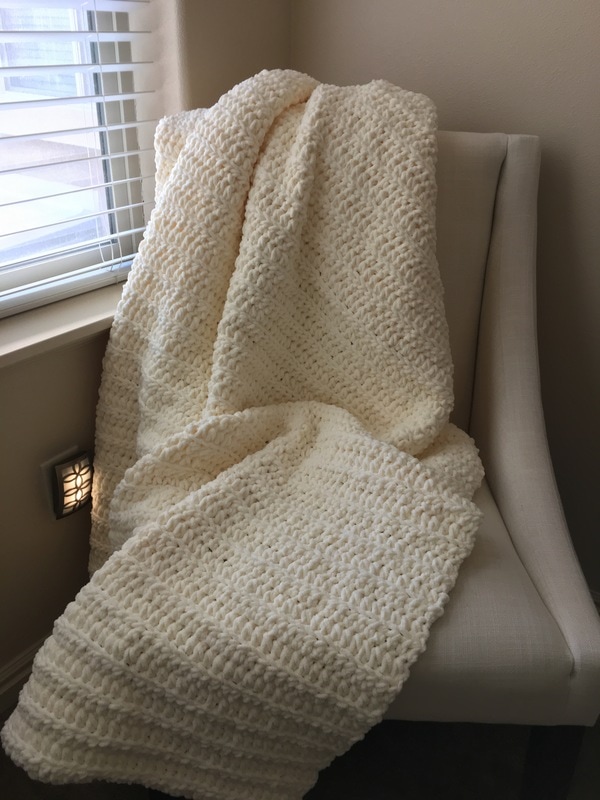
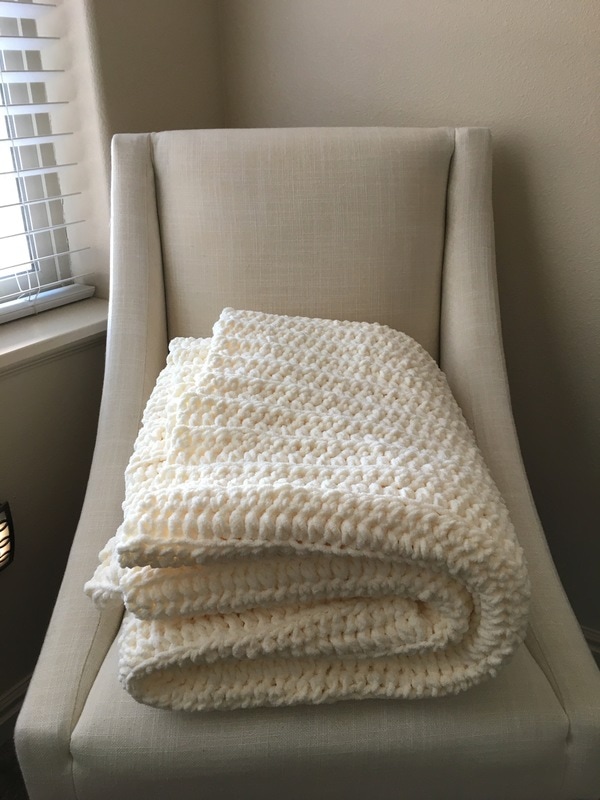
I am about to change your life. Okay, not really, but maybe I'll get close. I am going to share with you how to make the most perfect blanket. I made one for my husband and he uses it almost every single night (when I don't steal it from him when he's not looking). It is soft, warm, heavy and most importantly, easy. I decided on a simple lined pattern because it goes with everything. What I love most about this blanket is I can drape it across the chair in our bedroom when its not being used and it looks like it belongs there. It is the perfect compliment to any decor.
So lets get right down to it.
You will need:
Start by chaining 106 (this is completely customizable, go as wide as you would like)
HDC in the BACK LOOPS ONLY in 2nd chain from the hook.
HDC in the BACK LOOPS ONLY across.
Chain 1, turn, HDC in BACK LOOPS ONLY across.
Remember to crochet the entire blanket in only the back loops. This creates that simple lined look
Continue this back and forth until your blanket is the desired length. I wanted mine to cover me from head to toe so I crocheted until I could hold it up at my head level and it touched the floor. Go as long as you like.
You will need:
- 6-7 skeins of Bernat Blanket Yarn (Find it on Amazon in the link below)
- Size N crochet hook
- Time
Start by chaining 106 (this is completely customizable, go as wide as you would like)
HDC in the BACK LOOPS ONLY in 2nd chain from the hook.
HDC in the BACK LOOPS ONLY across.
Chain 1, turn, HDC in BACK LOOPS ONLY across.
Remember to crochet the entire blanket in only the back loops. This creates that simple lined look
Continue this back and forth until your blanket is the desired length. I wanted mine to cover me from head to toe so I crocheted until I could hold it up at my head level and it touched the floor. Go as long as you like.
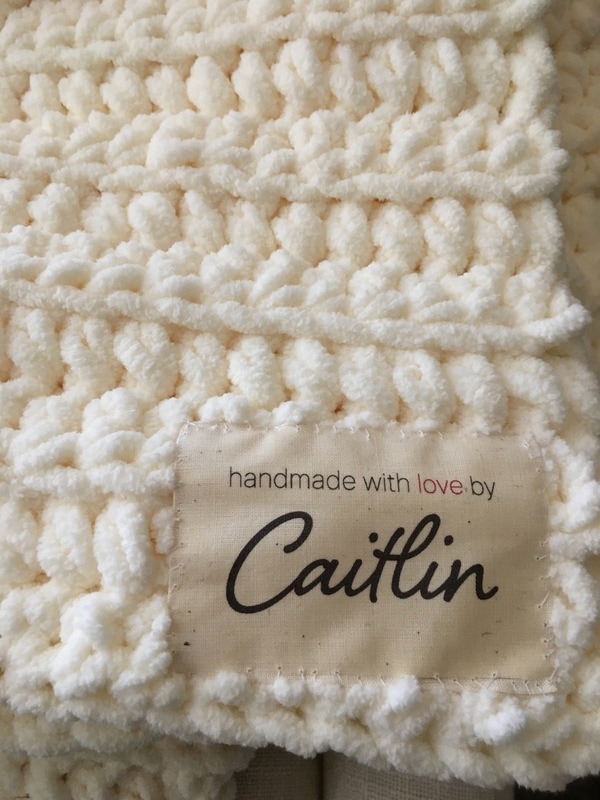
I also decided to add a little "tag" at the bottom to give it a special touch. I used an iron-on-transfer and a piece of off white fabric. I hand sewed the tag on the bottom of the blanket with white thread. I think its the perfect touch if you decide make this as a gift.
Good luck giving it up though, you are definitely going to want to keep it for yourself.
Good luck giving it up though, you are definitely going to want to keep it for yourself.
Happy crocheting!
-Cait
-Cait
These dishcloths are hands down, the best dish cloths ever. They are so sturdy and they clean just about everything. Throw them in the washer and use them again! Trust me, if you can crochet at all, even if you only know the basics, you can make these! They work so great for gifts!
*If you would like to purchase an inexpensive printable version of this pattern please visit my Etsy shop HERE
**I have also created a slightly larger version of this pattern. If you'd like to try that one please visit by clicking HERE
SUPPLIES:
1 skein of 100% cotton yarn (depending on the size of your ball, you can make a few cloths). Choose your favorite color!
Crochet Hook. Choose your size. I suggest anything from a size H-J. I will be using an I hook.
Stitches Used: Single Crochet, Half Double Crochet and Slip Stitch
*NOTE* The dishcloth will NOT turn out or work right if you don't use a 100% cotton yarn! Trust me on this. Buy the right yarn. You don't want to be washing your dishes with a dishcloth that sheds!
I used Peaches and Creme brand yarn but you can use any yarn that is 100% cotton.
So lets get started!
Start with a chain of 25.
(HDC) Half Double Crochet in the 3rd chain from the hook. Continue with HDC to the end (You should have 22 stitches across.
Chain 2 and turn your work. HDC 22 times, Chain 2 and turn your work. Continue until you have 16 rows total. (Do not fasten off!)
Chain 2 and turn your work. HDC 22 times, Chain 2 and turn your work. Continue until you have 16 rows total. (Do not fasten off!)
This is what your cloth should look like at this point. Hopefully yours looks a little straighter than mine ;)
You are now going to add a single crochet row around all 4 sides of your cloth to give it a little finish.
Start by putting one single crochet in the stitch you are on right now (refer to photo to see where my hook is at). Rotate your cloth so you can crochet down the left side.
Single Crochet in each space down the side. It doesn't have to be exact, just make sure its all even as you go down or your cloth will bunch.
Single crochet 2 at the end of the row (in the corner) I found this gives it a little more square look. If you want it extra square looking, go ahead and put 3 single crochet in each corner.
Rotate your work again and single crochet along the bottom in each chain.
Single crochet 2 in the corner stitch and rotate your work again to single crochet along the right side of the cloth.
Don't forget your 2 single crochets in your corners and rotate to finish the final side of the cloth. Slip stitch to the beginning and fasten off your work. You're done! :)

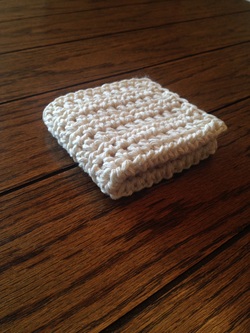
The finished product!
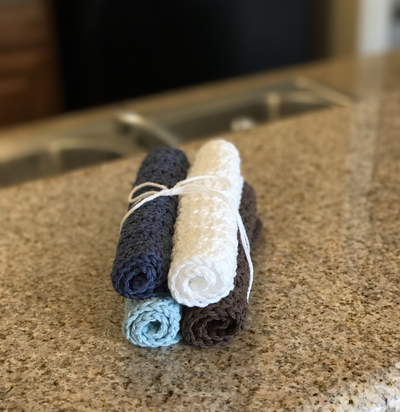
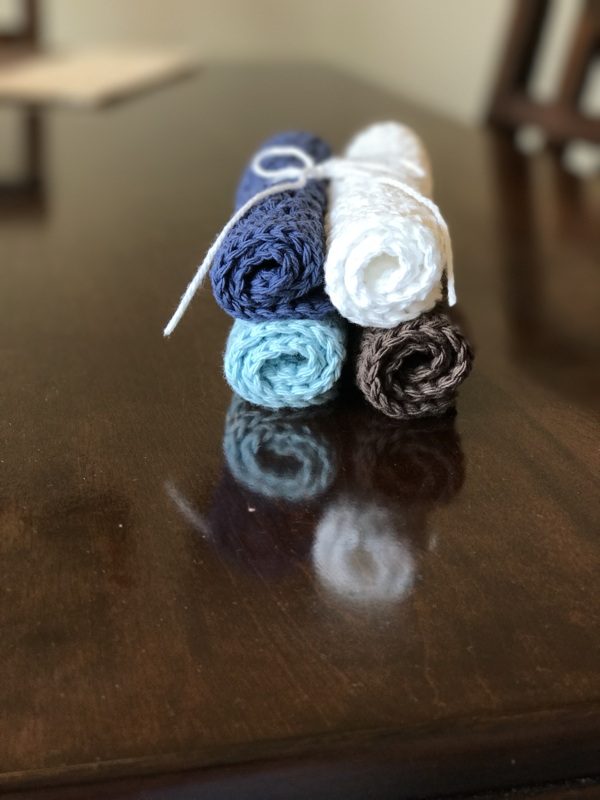
If you do plan on giving these as gifts, try folding a few together or even rolling and stacking 3 or 4 of them with a bow to hold them in place!
Enjoy and go wash some dishes! :)
-Cait
Click to set custom HTML
